
With my speaking engagement fast approaching on Saturday, I belted out another project as part of my speech. It appears that this week on the blog is gonna be signs. Next week a dollhouse. Funny how deadlines pave the way, no? 🙂
This was a fun one! I can always use more room in the workshop, so this little patchwork quilt reclaimed wood cabinet happened, made completely from scratch.
Here’s how I did it…

1. Locate thinner wood for a door, and thicker for the shelf.
2. Cut everything to size as desired.
Remember my how to build a crate post? That’s the basis of this frame too. So I won’t repeat what I wrote there.
I sized my cabinet according to the ‘door’ wood I had on hand. It was a thinner grade and as you can see, one piece wasn’t long enough. So I patched it and made a frame to fit.

3. Add a back support so you can install it on the wall.
It’s just like one more shelf. Cut one more piece and flip it on its side.
4. Screw all the shelves and back support in from the sides. (pre drill holes first)

5. Attach strips of wood to the back of the door.
I just used screws. Again. 🙂

4. Attach hinges to door and shelf.
I just rummaged through my stash of metal junk and found what I needed. A little WD40 and they work good as new again.
I messed up on the big hinge and naturally left holes everywhere, so I patched it. So know? The door opens up wonky, but it does work! 🙂
#hackfest

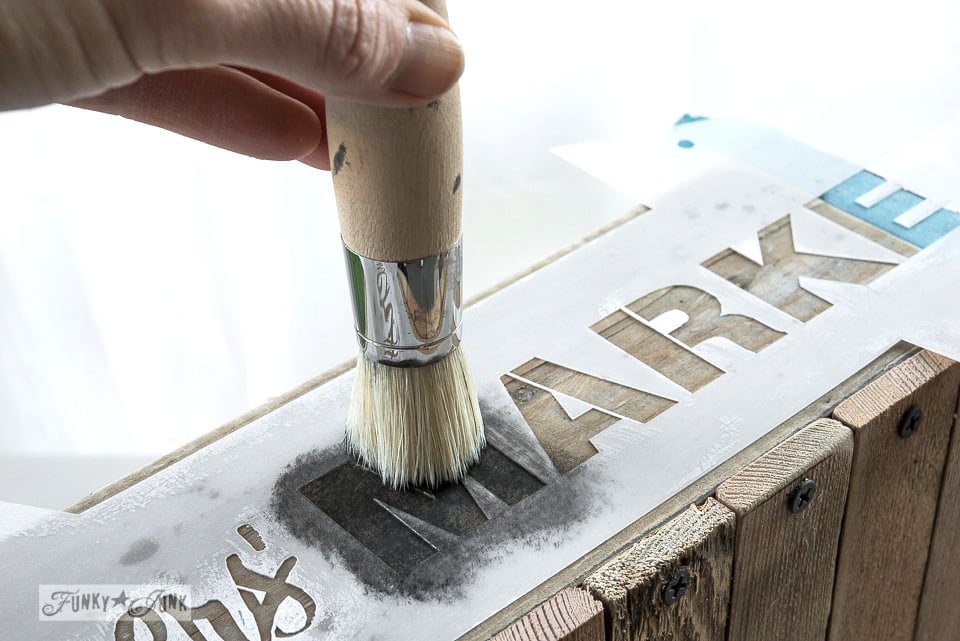
5. Stencil on design of choice if desired.
This graphic is the smaller Route 66 in my store HERE.
Hello there cute thing! I so badly wanted to put the smaller Route 66 to work and this proved to be the perfect size!

6. Stencil image.
Visit how to stencil like a pro HERE.
I chose black for the contrast against the blonde wood. I just LOVE black accents.

7. Tell your little hackfest cabinet how much you adore it!
So cute. SO CUTE! Lines as perfect as ever.
The design would have centred on the door just fine. But… well.. need I say more? 🙂 I love the hacked up effect this entire cabinet has and the off centre design just suits it in my eyes.
I did not further distress the painted image. I’m finding the way the stencil goes on, it leaves a texture finish due to the dry brush tapping, and I rather like it as is!


8. Add a door handle.
Upon more digging, I found ‘a thing’. I liked it! So I just drilled two holes from my Makita drill bit kit (Santa needs to get this for you) and attached ‘the thing.’
I need to go pick up more rusty ‘things’ from Granny and Grumpa’s rusty junk bin soon.

Oh I just love it! While I would have loved it anywhere in the house, it worked way too well in the workshop, so it had to stay.
It already has a super important job…

No more sawdust on my safety glasses! Whoop!
Now that’s a glasses case… 🙂

Did you just drool over my patchwork quilt installed rusty hinge?
You’re in good company. 😀

Colour everywhere!


My junky little workshop makes me very happy indeed!
 And here is the Historic Route 66 stencil. I used the 10″ x 10″ for this project.
Isn’t it CUTE?! 😀
Learn:
How to stencil in one colour HERE
How to stencil in TWO colours HERE
Visit all Old Sign Stencilled Projects to date HERE.
Disclosure / This post contains some product affiliate links.

Love the cabinet! Thanks for sharing!
You’re awesome and this is awesome! The whole space is gorgeous but I’m drooling over the hardware you used. What a fun handle and those hinges…. hubba hubba. 🙂 Great job!
xo Ashley
Aren’t those pieces so cool? There is NOTHING like shopping from a big ‘ol rusty junk bin!
OMG…is that ever sharp! Your Route 66 stencil is soooooooo cool, too! I think my favourite thing about this project is the old hardware you fitted it with…that really kicks it up a notch for me! Your safety glasses don’t even know how lucky they are right now! 🙂
Oh Susan… you so GET me! haha Thank-you!
I just love that cabinet, great job.
By the way the “thingy” that you used for the handle is a tail pipe/muffler pipe hanger/clamp.
But “thingy” works just as well. Love it!
Oh gosh.. I love knowing what this stuff is called! Tail pipe muffler clamp it is!
And I made sure I left the ‘y’ out of thing… I figured that was one notch up. 😀
Donna, you just get better and better – this is such a cute idea. I saw you today in my Country Woman magazine with the ladder turned shelf, you amaze me, you just always amaze me and make such great stuff.
Aww Heather, thanks so much! I’m still waiting for my copy to arrive so I can blog about it! 🙂
LOVE your “junky little workshop”!!
Well you have done it again…..another great stencil and an awesome project. I really like the extra things that you have added to the storage cabinet. The “O” is a great touch and the hinges really make the cabinet. Great Job….this rocks!!!
Aww thanks Tracy! There is nothing you can NOT do with junk! 🙂
This is SO cool! Perfection at it’s best, or should I say, old, beat up, funkilicious at it’s best. I can’t seem to carve enough time out of my days to build things lately but I can dream right? Just ordered my stencil and will get to it… some day 🙂 Thanks again for all the inspiration; you’re the best!!
Thanks for your order Shelly! Your comment made me smile… glad I could incorporate Maui in there for you… how did I know? 🙂 I can’t wait to see what you make!