Love old finishes and wish to save them safely? Learn how to properly seal chippy paint on a wood bench to maintain its authentic, rustic look to ensure a durable and long-lasting finish.

As a Fusion and Amazon Influencer, this post contains affiliate links in which I earn a small percentage from qualifying purchases at no extra cost to you. If you shop Fusion Mineral Paint products through this post, you will get 10% off. Thank-you for helping to support my blog!
After recently watching a video by an interior designer stating that distressed furniture finishes were no longer in style, I smiled to myself.
You’ll have to call me not-in-style then, because I just finished preserving the texture of an authentic chippy finish on an indoor bench that I am actually proud of!
You may have to actually squint to see before and after changes made to this piece. However I felt the bench deserved a story because sometimes saving a finish is the right thing to do… for YOU!
Creative ways I’ve used a wood bench:
Solid wood benches are such a find! I’ve used them time and time again for so many things in my home, such as:
A sitting bench to side table with storage
Expanded counter space as a coffee station
However I’ve had the cutest little vintage wood bench underneath a rustic barnwood mirror in my bedroom for a number of years since the depth and seat height is perfect for it. The chippy finish chimes in perfectly with the mirror frame and barn door headboard making like-minded types of wood like this just belong.
Thing is, I never did anything to it. Because of my lack of prep, the bench has always been somewhat difficult to clean and dust because of the rough surface. But the last straw arrived when the bench started to actually wobble, and with a large tall mirror on top of it, that would not do!
So it was time for a quick glow-up as they say these days. See? I can be current if I really want to be!
In most cases for furniture makeovers, one would expect to strip the paint down to the original wood, or give the piece a fresh coat of paint. I debated on both of those options. I actually made an attempt to remove the paint, but when all it did was gum-up, I decided to keep things easy and simply preserve the finish just the way it is now.
Because you just can’t replicate authentic! There’s value to it, if you like the look.

Farmhouse table – preserving the chippy finish
Here’s my point. You may remember this farmhouse table that was gifted to me by a very generous neighbour. The patina on this beauty is one-of-a-kind, so all I did was clean the table up, then protect the wood so it would last and be easy to clean.

So this little wooden bench is about to get the same treatment, so it can continue to live on with it’s authentic finish for many years to come.
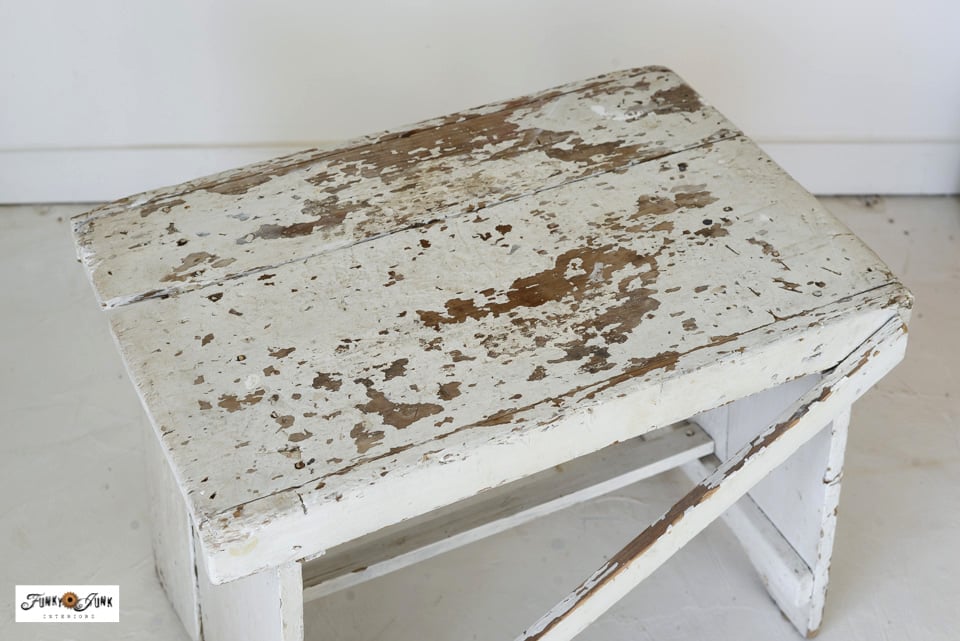
This is the before. The bench needed cleaning, a light sanding for regained smoothness, and strengthening so it no longer wobbled. Then of course, preserving so the bench would be easy to clean, and no longer chip!
Not only did the outcome turn out SO well, it’s even better than before! But you’ll barely see the difference, and that’s really the key to restoring a piece to its original form.
So if you too have a chippy furniture piece you’d like to extend the life to, here’s how to preserve that special one-of-a-kind finish only years of use will create!
How to Seal And Preserve Authentic Chippy Paint On A Wood Bench
Supplies I used:
TSP Alternative by Fusion Mineral Paint
Tough Coat Matte Finish by Fusion Mineral Paint
Cordless drill (I like the weight of a Makita drill)
High grit sandpaper such as 320

Repairing a wood bench
The first thing I like to do to a piece of furniture is to strengthen or fix it. I look over all the joins to see if it can be strengthened as-is without major replacement.

Since this bench has been nailed together, some of the wood joins were pulling apart. So I strengthened any of those weaker areas by using screws for a quick, easy and strong fix.
Note: Old wood can be brittle so you may wish to consider pre-drilling pilot holes before adding new screws. Just use a drill bit that makes holes sized slightly smaller than your intended screw size.
I like drill bit sets like THIS Makita one that has it all.

Scraping and gently sanding the paint
On chippy finishes, it’s common to find flaking paint since that is how to achieve an authentic chippy effect! Using a small paint scraper, I ran it against any flaking paint surfaces and all edges to attempt to scrap any loose flakes.
Being that old paint may contain lead, it’s a good idea to do this step outdoors while wearing protective gear.

Hammering any protruding nails on wood bench
I also used a hammer on every nail for added insurance, especially on the nails that were starting to protrude. Nails can loosen over time, so this proved to be a wise step.

Cleaning the wood bench
Next up is to clean the piece before officially sanding or adding protection.
How to use Fusion’s TSP Alternative
I like to use Fusion’s TSP alternative for cleaning all furniture pieces, because it’s:
- super concentrated so it lasts a long time
- non toxic – no need for gloves
- no need to rinse off after drying
I poured about a capful into this little pot of warm water, then used a rag to wipe every nook and cranny down, scrubbing a little harder on any staining present. You could also use a scrub brush for more stubborn stains if desired.
Scuff sanding the surface
Next, I used a sanding sponge block to scuff sand the entire surface since I didn’t wish to alter the look nor remove any of the paint.
After sanding, a quick wipe with the TSP Alternative is all that’s needed. Or you could also use a tack cloth to remove any remaining dust.

Protecting the chippy paint surface
To protect chippy paint, I like to use Fusion Mineral Paint’s Tough Coat in the matte finish.
- water based
- tries quickly
- doesn’t yellow
- easy to apply with brush or sponge

How to apply Fusion’s Touch Coat:
For a chippy surface, I like to use a simple chip brush. I squeeze a small amount of product on the surface, then brush it until the surface is completely covered.
- lift the bottle, and use gentle circular motion to stir the product without shaking which will create bubbles. Stirring will mix the matting agents with the product.
- pour Tough Coat into a container or on your project
- use a chip brush to cover the surface
- finish off with long even brush strokes from end-to-end
If you use Tough Coat on a smoother and darker surface where you may see visual brush strokes, I suggest to apply it a Tough Coat Applicator Sponge.

Quicker top coat drying with a fan
The Tough Coat doesn’t take long to dry, however I like to speed up the process by setting a blowing fan on the wet surface.
A fan helps a great deal for drying most products since drying is more about flowing air rather than temperature.
I love how my Honeywell fans perform and have several around the house. They are especially useful sitting in a window sill facing towards a room to bring in fresh air!

A final sand with high grit sandpaper
For a final touch, I like to run a high grit sandpaper over the finish surface. You’ll find most products leave a little ‘drag’ when you run your hand against it. A high grit sandpaper like 320 I’m using creates a buttery-smooth feel without damaging the finish.
Just test accordingly on darker surfaces. If the scuff marks show, I would skip this step.
The finished, preserved wood bench
And that my friends, is how to preserve and keep a beautiful chippy finish!
The new look is a cleaner version, with all the quirks still fully present, ready to tell chippy paint stories for many years to come!

View Cross pattern pillow tutorial HERE
Cross Pattern stencil is from HERE
This is such a cute wood bench design! I love the cross braces, the size, and everything else about this bench. I couldn’t imagine it in any other colour. The chippy white suits it and makes it timeless in my opinion!

So I quickly staged the bench in my photo studio so you could appreciate every nook and cranny of the refinishing in good lighting.
This really is the perfect bench for so many uses! The size is perfect for sitting comfort for sure, however here’s a few other reasons I like to collect wood benches:
Reasons to pick up a wood bench:
- suits a variety of styles
- creates a durable sit
- easy to pad with a cushion and fabric if desired
- adaptable to many different uses (ie: seating, serving table)
Different ways to use a wood bench:
- extra seating or side table in a living room
- entryways for putting on shoes
- for extra folded towels in a bathroom
- hallways for a place to stash keys
- outdoor areas such as a workshop, garage, patio table
Uses for outdoor benches:
- as a base for a bird bath bowl
- patio side table
- outdoor use as a lawn side table

I’m personally glad my attempts to remove the original paint failed. I like the bench finish just the way it is, and will be proud to display it no matter where it may land! I’m just glad it’s out of storage and ready to perform once again!
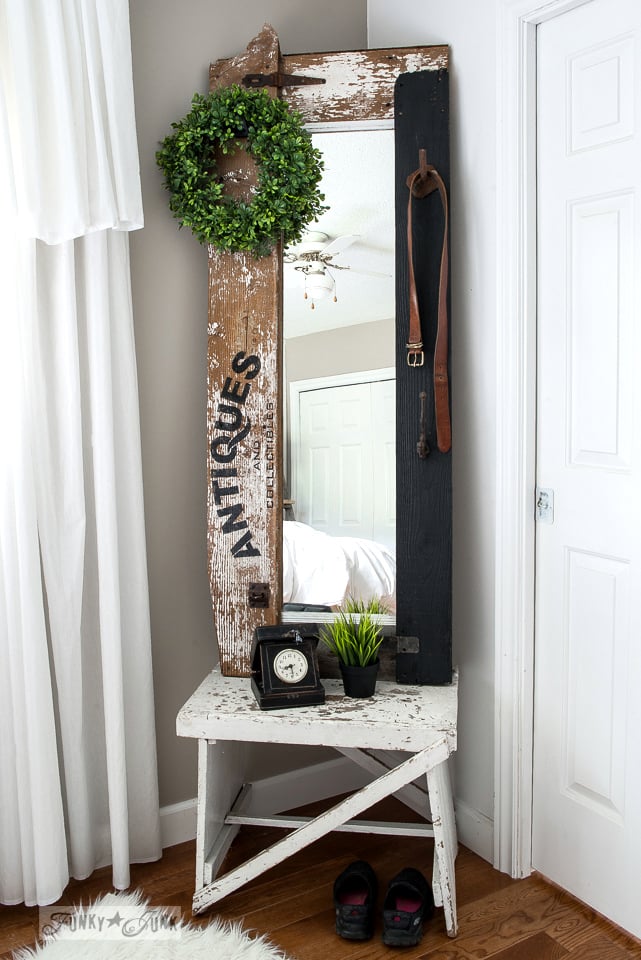
Barn wood mirror frame tutorial is HERE
And here’s the bench while it was used as a base for the big ‘ol barnwood mirror. It really is a perfect fit, isn’t it?
Chippy or distressed finishes may be ‘out’, however I personally think there’s always a special place reserved for authentic finishes that cannot be replicated. I’m not against repainting. But I think in this case, beauty is in the eye of the beholder. You are the owner of the piece, so you get to do what you like and what serves your style of home best!
Wouldn’t you agree?
What would you do to this little bench to suit your home?
See other fabulous furniture makeovers HERE
View other unique bench ideas HERE
Printable version below:
How to Seal And Preserve Authentic Chippy Paint On A Wood Bench
Supplies:
Instructions:
- Repair any loose or wobbly joins.
- Use a paint scraper to remove any loose and flaking paint.
- Clean the piece with TSP Alternative for a safe, non-toxic option.
- Once dry, lightly sand the finish with a sanding sponge. An orbital sander can be used with caution if you wish to remove more paint.
- Paint on a coat of Fusion's Tough Coat in matte finish to protect the finish.
- End with high grit sandpaper to knock down any rough areas.
Hurray for saving the chippy bench! I love chippy finishes so the heck with the “pros” and keep the chippy finish!
Wow! So cool how that mirror, fit on it! I’m glad you left it chippy. I think it’s a style that will always be around, because to me, it says, I’ve been loved for many years! lol. It gives a homey feel, for me.
Thanks on that tutorial, I think I am switching to Fusion.
Thanks Mary! This little bench was definitely worth saving! Love the shape. Fusion is a super durable paint once it fully cures. You will be amazed!
Meh, who cares what’s “in style,” it’s all in the eye of the beholder. I think that little bench is perfect!
That lil’ bench has indeed had a glow-up and would look great everywhere! I’ve been seeing soooooo many of those articles & posts about ‘what’s IN / what’s OUT for 2025’ – and the funny thing is, the SAME THINGS can be either ‘in’ or ‘out’ in different articles! It’s mind-boggling to try and keep up with industries that just want us to buy, buy, buy new things all the time.
Like you, I am of the mind that anything we can do to reduce, reuse, recycle, and re-imagine items we already have or can get second-hand is the best way to go – yes, it helps save money, but it also helps keep things out of the landfills. And a good creative challenge or ‘rescue’ project is a worthwhile way to spend time! Keep leading the charge, Donna!
She’s a beauty, and I’m so happy you shared this, Donna. We have one that’s a bit smaller with a lovely chippy effect that’s losing her chippiness too quickly for my liking. Guess what I’ll be doing next weekend.