
Industrial cart coffee crate side table
This next year, I plan to ‘upgrade’ a few key pieces of furniture that I’ve made over the years, to give them more of a ‘grown up industrial edge’.
Yes. I want my junk to grow up. Just a little.
For one, while my pallet wood TV media stand is still standing strong, I’d love to infuse more metal into the mix.
Wow. I just checked the date on that one. It’s 7 years old! One of my very first furniture pieces. Yes. I’m indeed overdue for a few upgrades.
So anyway, that takes us to today.
While I was decorating for Christmas in the living room, two stacked crates in the corner just looked so.. always been like that. I basically hauled them out of my stash and plunked them into the corner.
This seemed just like a really good time to ramp up that industrial edge right away. Now what could I do…
After rummaging through my rusty junk stash, the idea came quickly. These crates were about to morph into a little industrial cart… of the faux kind!
I’m no stranger to faux if you remember my fake barn door headboard, or my old gate window screens. It’s fun to fake it! And a whole lot less expensive.
Well, the industrial crate cart indeed did work out. Whoop! The start of something new around here…
First I’ll show you how I made it, then show you the Christmas version below.
This post contains some affiliate links.
Industrial cart coffee crate side table
Supplies used:
stencil optional – I used International Coffee HERE
paint optional – I used Fusion Mineral Paint’s Coal Black / or purchase from merchant HERE
furniture wax – I used Miss Mustard Seed’s Furniture Wax in plain, and Fusion Mineral Paint’s Espresso
full swivel casters / standard / super cool industrial
cordless drill and screws
rusty ‘ol clamps
rusty junk wheel things (good luck!)
How-To:
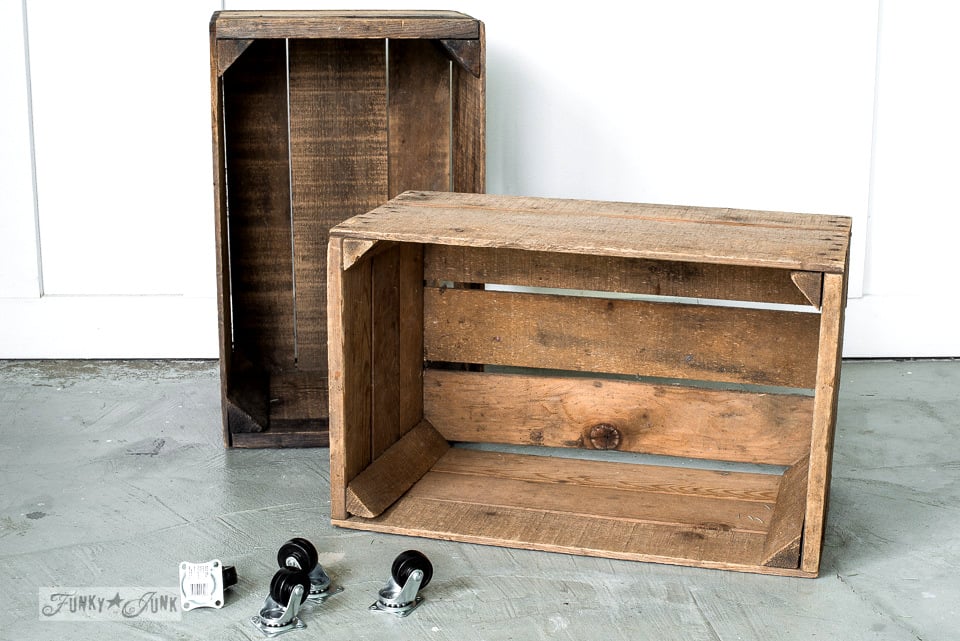
I started with two like-minded old crates and some full swivel casters.
I had these smaller rubber casters which I do love because they are rubber and easy on hardwood floors. However because they weren’t very industrial, I had an idea.
You can however jump to industrial casters HERE if you wish!
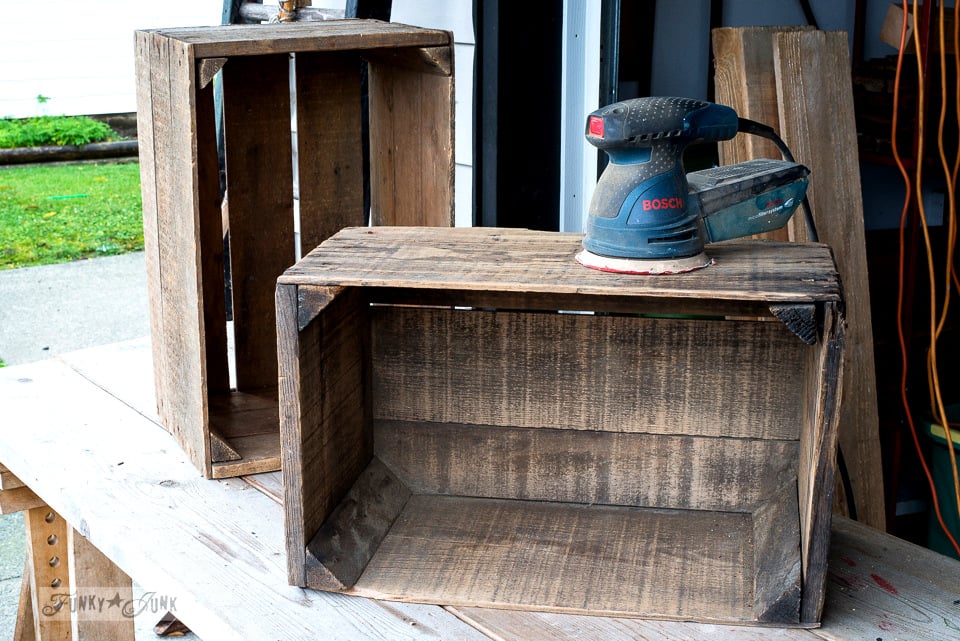
The crates first got a good sanding inside and out to finally smooth a few sliver infused edges.

The two crates were then stacked and screwed together.
This was also a good time to tighten up some creaky joins here and there. Finally.

Because one crate was lighter than the other, I treated them to look more unified with a mix of two waxes.
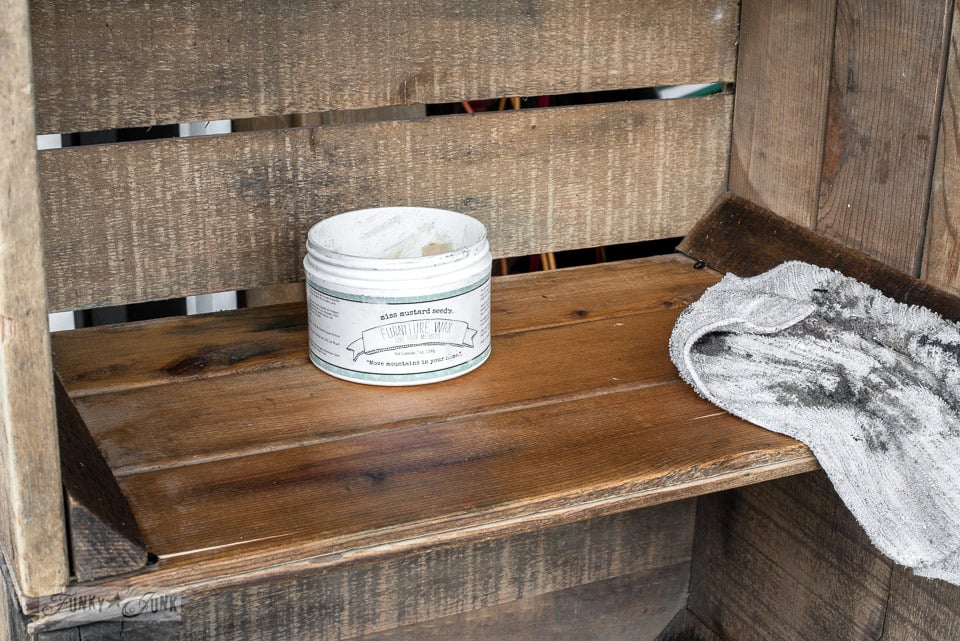
How to age newer wood with wax:
I first went over the wood with Miss Mustard Seed’s Furniture Wax in clear, the did a spotty finish using Fusion Mineral Paint’s Espresso Wax, blending the two in.
Adding a clear wax first gives you more control over the pigment intensity. This made it really easy to add more dark wax here and there, blending the edges in.
My goal was to simply marry the two crates like they had the same finish, so perfection wasn’t even on my radar. What old crate is perfect?!

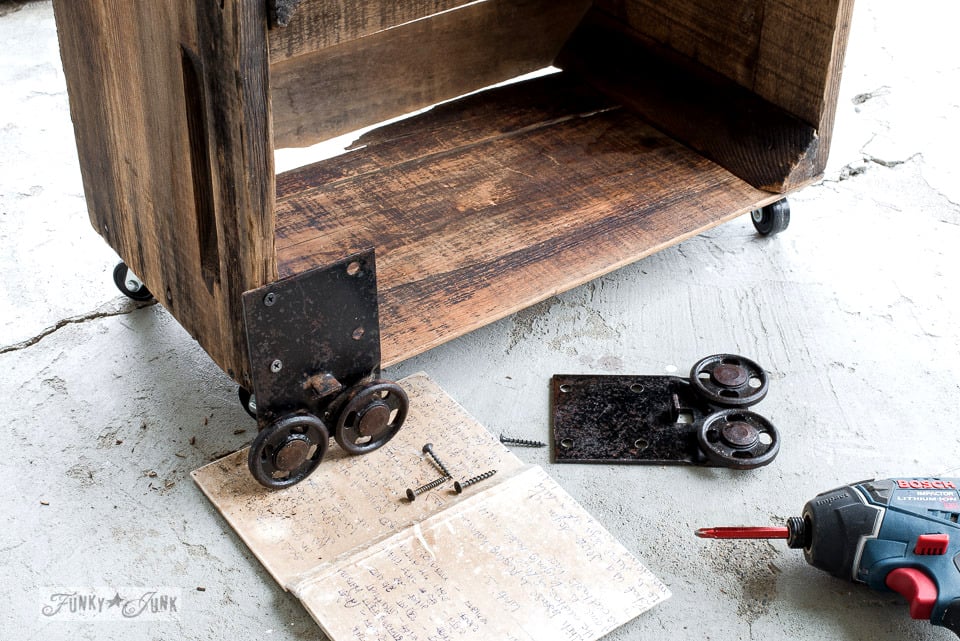
Swivel casters were screwed onto the bottom of the stacked crates.
Tip: I prefer full-swivel so your piece glides as light as a feather when it’s moved around.
Adding industrial touches:
I had these weird wheel things in my rusty junk stash and felt they could help the crates resemble a cart of sorts!
A book was slipped underneath where they were to be mounted, offering a little height off the ground. This would allow the original wheels to easily glide.
They even hide the swivel casters if you look at the cart head on. Cool.
Then I added a couple of clamps, a big ‘ol hook thing, and a board to tie the two industrial wheels together, and ended up with…

The Reveal:
… this! I mean, just how fun is this thing?

Then I played with accessories. I like how the black Farmhouse sign helps anchor all that black.
Duly noted. This new toy likes black accessories.

I think my fav part are the clamps. Their placement pretends that’s the way the crates are being held together.
Ok, I also admit, I like the gritty wheels too. They certainly add a punch of industrial, don’t they?
So! The main function of this crate cart was to hold a lamp in the living room. Due to the dark nature of the area, I decided to just illuminate the entire thing for Christmas!

Bringing out one of my fav pipe lamps from back in the day (remember the sawhorse bracket challenge HERE?) and a string of white mini lights, this was the fun result!
The string of lights was threaded into each crate from the back, and the rest on the floor behind the crates to help illuminate this little dark corner.

To push the illumination a little further, the white mini lights were inserted into an old bait bucket that casts a pretty neat design! And the 2nd crate was filled up with some ornaments over top of the lights for a glowy effect.
However, as hard as I tried, (oh I tried…) I just couldn’t leave the little cart just be.
Something was missing. I already knew what it was, but I fought it.
But ultimately lost. Or won. Take your pick!
So I dragged the crates downstairs one more time to ice the cake.

The crate top got a stencil treatment of a barely there weathered Coffee Roasters Est.1901 treatment.
And NOW I could deem it done. My sign-aholic sickness continues to thrive, thankyouverymuch.
How to barely-there stencil:
Using a VERY dry to the touch paint loaded stencil brush, the image was stenciled on super uneven, even missing parts of some letters to make it look authentically weathered. No sanding will be required if you’re really light handed with that paint.
You can learn more on HOW TO STENCIL HERE
Stencils used: International Brewers Coffee and Antiques found HERE
NOW it’s done!
Or so I thought.
30 minutes later, I moved the antiques crated Christmas tree which moved the living room around and came up with… egads. Yet another version of this crate.
But don’t worry, I’ll show you that one too!
Even I can’t keep up with me…

Wow! Just wow! I think your little fireplace side table is awesome!
FIREPLACE… now you really got my (non industrial) wheels turning!
How do you do it Donna? Rusty metal and wooden bits don’t stand a chance when you get hold of them. The crate side table looks amazing. Love the way you saw faux wheels when everyone would have seen a metal thing with rings on it. I wonder what on earth they were in their previous lifetime. So cool
Aww… thanks Michelle! Yeah, super good question. What ARE those things?!
Which is actually something I say every time I visit a hardware store too. Maybe it’s better we don’t know what stuff is so we are more inclined to let them just be anything? HAHA
Love the hardware on this project. Especially the faux wheels on the front and that hook on the side! And the bait bucket is such a dear accessory. What a great use for two crates. Nice.
Thanks Brenda, I’m diggin’ the vibe of it too. In fact, I think I like the new not yet blogged about version of it even better…
Love it! Those little wheels are perfect!
I love everything about this! The clamps are my favorite part too. It was amazing in its first version but when you lit it up: WOW!! Can’t wait to see the other one!
Oh Donna isn’t it fun! I really enjoyed reading how you did the industrial crates. You must be a mind reader because in the post of your Xmas tree I saw the two crates stacked together and thought “WOW! They are cool. The stuff one could do with them.” And in the future I want to try it. Thanks for sharing.
Now this is the Donna we know and love. Was waiting for a killer project! You’re going to send all of blogland running out to find bait buckets.
Haha, now that’s funny! And thank-you! I will be building more in the new year… my house is begging for it!
Wow, I love everything in this post. Thank you, and happy Holidays
I love it!!!! 🙂