Love wooden Christmas trees but don’t want a major build on your hands? Here’s how to build a quick and easy herringbone wood Christmas tree that only LOOKS challenging! The outcome is an expensive, high-end look that’s actually very easy to achieve, thanks to stencil templates used as a design and cutting guide! No measuring required! Use cedar planks as 3D pieces and watch this Christmas tree decoration spring to life!
Sign up HERE to receive our newest upcycled projects and stencil releases sent straight to your inbox!
This project is sponsored by Homestead House Milk Paint. All opinions are my own. This post also contains Amazon plus other affiliate links in which I earn a small percentage from qualifying purchases at no extra cost to you. Thank-you for helping to support this blog!
‘Tis the season to start dreaming up unique and interesting crafts and holiday decor! And one of my main Christmas decor choices is always some kind of wood tree.
I’ve made plenty of DIY wood Christmas tree ideas, and even wrote a big ‘ol post combining ALL of them HERE so they are finally now super easy to find!
While most of those are small wooden Christmas trees, I was also inspired to try a couple of DIY Christmas trees that were larger so you could decorate a Christmas front porch with them.
Other wooden Christmas trees:

Wooden Christmas tree sign with crate skirt
It started off with this Tall Christmas Tree sign with a wood crate skirt, which was a fan favorite!

The following year, I came up with another… a Pallet Christmas Tree sign that had all the vibes of a wood Christmas tree without the major building. This wooden tree project with instructions continues to be my top Christmas project!
Since DIY Christmas trees are so fun to make, I decided to come up with a new idea this year that resembled the Pallet Christmas Tree, but this time, with a herringbone pattern to the wood. Fun!
Since a Herringbone wood Christmas tree looks rather complicated to make, I first wanted to come up with an easy way to make one!
So here’s the secret ingredient that flipped a complicated idea into an easy high-end looking project…

Herringbone Christmas Tree stencil is HERE
Herringbone Wood Christmas Tree stencil
The Herringbone Wood Christmas Tree stencil HERE is the key that makes building this wood Christmas tree project an absolute breeze!
This tall, vertical Christmas tree stencil is designed to stencil as-is, or is scaled to use real cedar planks for the branches to create a whimsical 3D effect, which we are doing today!
This stencil is robust, coming with a full tree image, along with a bag filled with all the tree body planks to provide a simple way to measure individual real wood planks for cutting. Then stencil rustic screws and pallet sayings on the branches where desired.
So let’s make this Christmas tree! Here’s the full tutorial…
Herringbone wood Christmas tree sign
Supplies you’ll need:
Herringbone Wood Christmas Tree stencil from HERE
Stars And Snow stencil from HERE
Homestead House Milk Paint in Coal Black / Grey Silk / Porcelaine (get 10% off)
Hemp Oil or Furniture Wax (get 10% off)
Paint alternatives – Fusion Mineral Paint in Coal Black, Cast Iron or Ash / Casement (all 10% off)
Wider paint brush (10% off)
Wood planks – that covers at least 16.5″ wide total x 36″ long. I used 3 x 5.5″ x 36″.
2-3 cedar lath strips measuring 1.4 x 48″ long (slightly smaller or larger will work too, just adjust the gaps accordingly)
Stain and Finishing Oil at 10% off (optional) or embrace the natural wood look as I did
Glue gun and hot glue sticks (or wood glue)
Miter saw (see why I adore my Bosch miter saw HERE)
Cordless drill (I’m partial to Makita for their power and light weight)
Read my own recommended DIY tool must-haves HERE

Selecting your boards
1. Select boards that can house the total tree image size.
- The total tree stencil image measures: 10″w x 32.5″
- My finished sign size measures: 16.5″ wide x 36″ tall.
- I used 3 x 3.5″ x 36″ boards, and two smaller cross boards for stability.
I decided to dismantle an old coffee tray project I had in my stash, since it happened to fit this stencil perfectly!
Turning the tray to the back, I had a LOT of random paintings to cover since I used the back as a sample board. Busted. Heh.
Now if this isn’t a perfect testimony on how well this milk paint will cover and transform, I don’t know what is. LOL
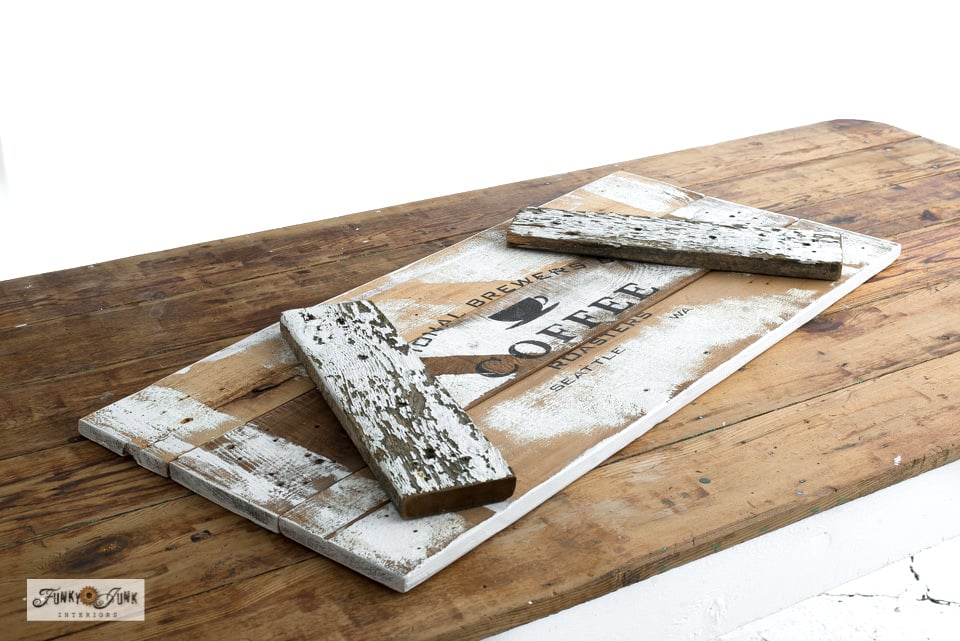
I removed the two side supports, and positioned them to better brace the 3 sign boards so they wouldn’t move. Placing the support boards on two angles did the trick perfectly.

The support boards were attached with screws from the back side to better hide the screws.
Homestead House Milk Paint in Coal Black / Grey Silk (get 10% off)
Painting with Milk Paint
2. Choose your DIY paint of choice.
For this project, I painted with Homestead House’s Milk Paint (get 10% off)
Perks of Milk Paint:
- You will never get brush strokes with milk paint since there is no resin in the paint to hold the shape.
- Milk paint lasts forever and never dries out. Mix only what you need, then store the rest until needed.
- Easy to mix your own custom colours.
I desired to create this simple wooden Christmas tree sign against a night sky so the wood planks would really pop, so I chose Homestead House Milk Paint in Coal Black.
How to mix Milk Paint
- Pour some milk paint powder into a container.
- Add equal parts water to powder.
- Stir well with a whisk, spoon or stirring stick.
- Allow the paint to sit for a few minutes.
- Give it one more good stir, then begin to paint.
- Stir in between painting to keep it well mixed.
Want to learn more about milk paint? Read my own All About Milk Paint review HERE

3. Ensure planks are smooth, then paint in your chosen colour.
I honestly thought I’d need to coat the boards at least 2 or 3 times, but nope! The coverage was great in one coat.
But as a side note, I do wish I had sanded the boards before painting to make them smoother than what they were. Since I was going to add a finishing coat to the milk paint, imperfections will show up moreso.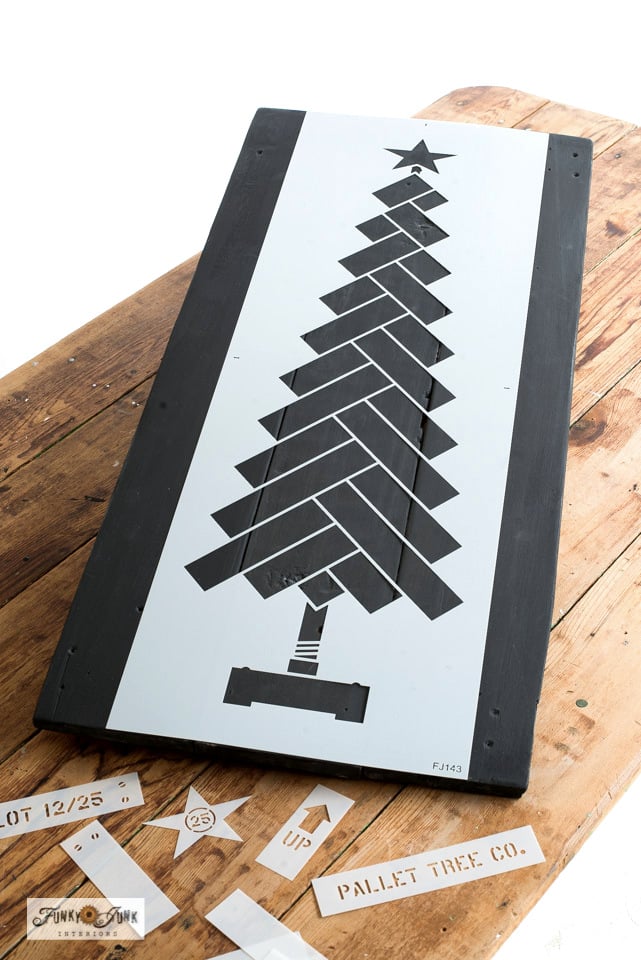
4. Position the Herringbone Wood Christmas Tree stencil in the middle of the planks, held in place with masking tape.
Tip: If you run a long piece of masking tape on just one side of the stencil, it creates a door hinge effect so you can lift the stencil to check your progress easily!

5. Choose a grey tone for the metal pipe tree trunk and tree skirt, as well as the star on top.
Since I was going for a galvanized look for the Christmas tree stand and star, I created my own perfect grey with what I had.
How to mix a galvanized pipe grey colour:
- Mix Homestead House Milk Paint in Coal Black and Grey Silk together in the same container.
- Add water, and stir.
- Test the tone, and alter as desired.

How to stencil the tree images
Stenciling the body of the tree
6. With a very light touch, stencil the tree body shapes as a guide for cedar plank board placement. Otherwise, stencil normally.
- load your stencil brush with paint
- remove most paint onto a cloth until brush feels dry
- tap or swirl paint through the stencil for the desired effect
- if images aren’t sharp, remove more paint off your brush before continuing
Stenciling the tree stand and star to look like metal
7. Stencil in the tree star at the top of the tree, and the industrial pipe tree stand to resemble metal.
I started with one tone of grey, then added more layers of different tones of grey and black, so it created more of a mottled galvanized look. Then keep layering until you like the look.

Cutting and placing the cedar planks
8. Place each ‘loose plank stencil’ on top of a real cedar plank, then draw pencil marks for cutting.
9. Cut each pencil mark with a miter saw.
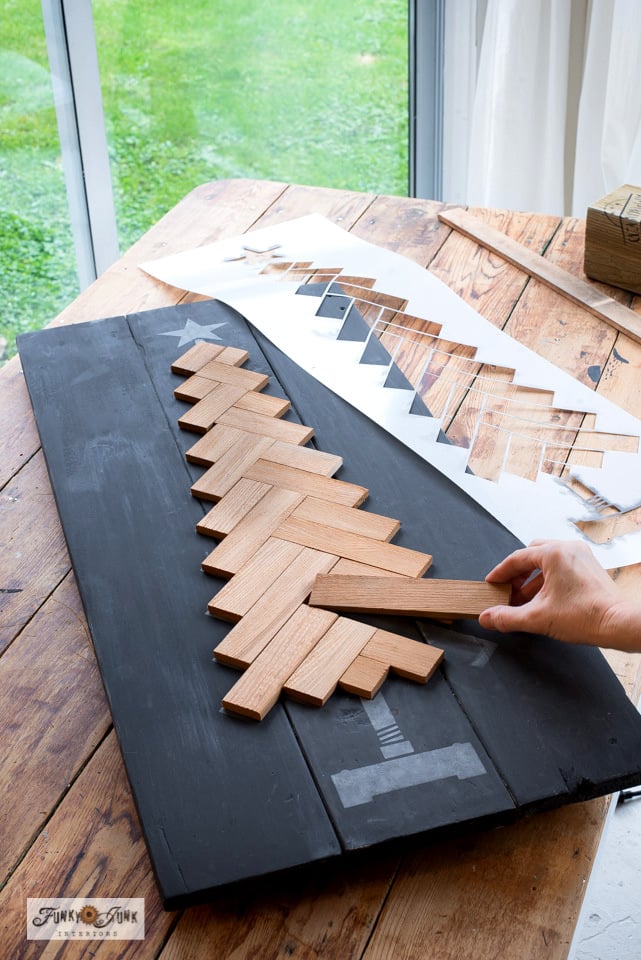
10. Position each cut cedar plank on the stenciled tree body.
Each plank is a different size, so it’s very easy to match up the boards to the stenciled images.
Attaching the cedar planks
11. Hot glue each cedar plank into place.
Yup, just a plain ‘ol simple glue gun with standard glue sticks worked magnificent! You could also try using wood glue or a nail gun if desired.

While I added small gaps in between the cedar planks, the above photo shows a dry-fit with no spaces. Both ways look fantastic!
How to keep the wood planks aligned:
- Start at the bottom of the wood Christmas tree in the center, right above the the tree stand pipe. Then align the next plank on the right, creating a straight line along the top edges of the two boards.
- Then work to the left, where the next two boards line up together along their tops.
- Move up the tree, always positioning boards that line up together first. This really helps keep the boards nice and even as you go.


Adding pallet details to the cedar planks
12. Stencil pallet sayings on each cedar plank in black or grey where desired, using the images on the plank stencils.
Adding a sky effect around the tree
13. Add a night sky effect around the tree by stenciling with Snow and Stars stencil in white.
- Mix up some white paint. I used Homestead House Milk Paint in Porcelaine.
- Position Stars and Snow stencil images around the tree.
- Stencil some stars and snow darker (2 coats) and some lighter (1 coat). The two tones give the illusion of twinkling stars and falling snow!
Top coat if desired
14. If desired, add a top coat on the painted black areas, avoiding where the cedar planks will be glued, for best adhesion.
If you’re using milk paint, you’ll find the black looks like a dark grey matte finish. You can enjoy the rustic look as-is, or add a little depth and sheen using a top coat such as hemp oil or furniture wax.
I top coated with hemp oil. This step is shown in the video below this post.
Ready to see how adorable it turned out?!
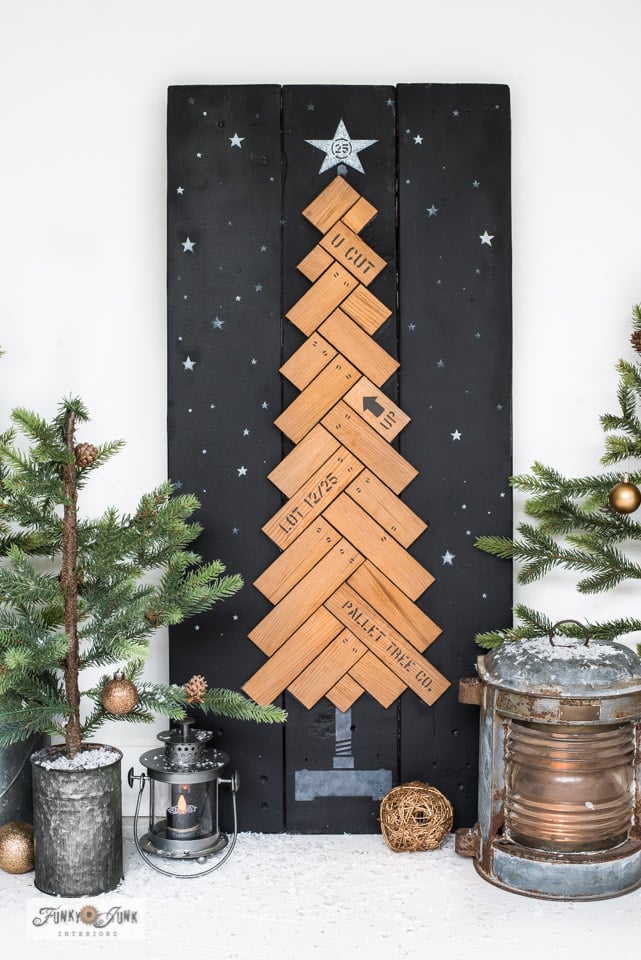
And here it is! The perfect, vertical Herringbone wood Christmas Tree sign that was SO simple to make! A look that appears complicated, but it sure isn’t.

The 3D effect the cedar strips gives off really makes the Christmas tree sign pop! And of course, gets in that real wood warmth vibe we all love.
And isn’t the night sky of both stars and snow wonderful? It’s so subtle so it doesn’t take over, but just enough to create added sparkle and whimsy to this sign.
Other ways to decorate the pallet tree:
- Add fairy lights.
- Hang rusty washers or skeleton keys on the tree for a Christmas junk effect.
- Replace the stenciled screws with the real thing!
- Decorate the base of the sign with other wood trees like THESE
- Stage with vintage-inspired lanterns
- Sprinkle faux snow around the base and on top of small faux evergreen trees
- Shop for copper ornaments to chime in with the woodsy tones
- Add some wicker ornaments for a rustic look

Here’s a close up of the metal tree stand, that has a mottled effect to achieve a galvanized look.
If you really think about it, the tree is quite simple!

However, this high end-looking Christmas tree looks anything but! Don’t you agree?
Isn’t it cute?
Are you inspired to give a herringbone wood Christmas tree sign a go this holiday season?
Video tutorial: Herringbone Wood Christmas Tree
.
Watch the steps in the short video above to see the tree being made in action!
Create an easy Herringbone wood Christmas tree sign, pallet-style!
Supplies:
- 1 Herringbone Wood Christmas Tree stencil
- 1 Stars And Snow stencil
- 1 Coal Black -Homestead House Milk Pint
- 1 Grey Silk - Homestead House Milk Paint
- 1 Porcelaine - Homestead House Milk Paint
- 2 Dome tip stencil brushes
- 3 Reclaimed wood planks creating a base 36" tall (min) x 16.5"w (min) combined (this is what I used) 5.5" x 36" minimum
- 2-3 cedar lath strips 1.5" wide x 4 feet long
- 1 Hemp Oil top coat is optional but recommended on top of milk paint if you don't wish for matte finish
- 1 Wider paint brush like this Palm Pro
Instructions:
How to mix Milk Paint
- Mix equal amounts of milk paint powder and water into a container.
- Allow to stand for a few minutes, mix, then paint. Continue to mix in between painting.
How to stencil flawlessly without paint bleed
- Load stencil brush with paint.
- Remove most paint onto a rag until brush feels dry. This ensures crisp images.
- Tap or swirl the paint through the stencil until desired effect is achieved.
Preparing the sign base
- Create your board backdrop to measure at least 36" tall x 16.5"w combined to fit this stencil image. Each plank I used is 5.5"w x 3.
- Paint the board backdrop in paint and colour of choice. I used Homestead House Milk Paint in Coal Black.1 Coal Black -Homestead House Milk Pint, 1 Wider paint brush like this Palm Pro
Stenciling the tree images
- Position Herringbone Wood Christmas Tree stencil in the center of the boards.1 Herringbone Wood Christmas Tree stencil
- Stencil image very lightly over the wood plank images (if covering with cedar strips), to help guide cedar strip placement.Stencil normally on the tree star and tree stand in grey to resemble metal.Add additional paint coats over metal areas for a mottled metal effect, as desired.1 Grey Silk - Homestead House Milk Paint, 1 Coal Black -Homestead House Milk Pint
- Add a night sky stenciled in white with Stars And Snow stencil, working around the tree image. Rotate 1 vs. 2 coats of paint over the sky images to create a twinkling and movement effect. It's really cool!1 Stars And Snow stencil, 1 Porcelaine - Homestead House Milk Paint
Top coating (optional)
- Top coat the sky, star and tree stand only (not where the tree will be glued) with Hemp Oil if desired, to add smoothness and tone depth. Do not add hemp oil to the areas where the cedar wood pieces will be glued.1 Hemp Oil
Adding cedar strips for a 3D effect
- Place the included individual 'board stencil pieces' on top of 1.4" cedar lath strips to measure, then cut with a miter saw.These stencil pieces are very handy, saving you from having to measure each cedar strip.1 Herringbone Wood Christmas Tree stencil
- Hot glue the cedar strips onto the tree body.
- Stencil words and screw tip images in black on the cedar strips with the included 'board stencil pieces'.
Notes


Sign up HERE to receive our newest upcycled projects and stencil releases sent straight to your inbox!
More DIY Wood Christmas trees to make:
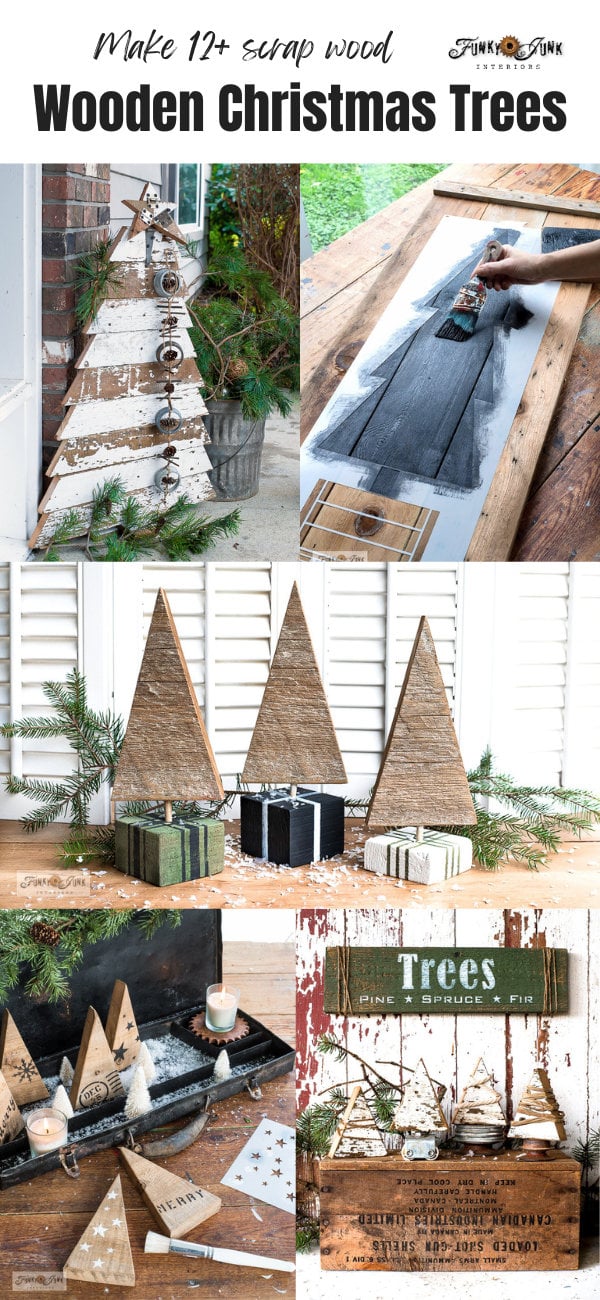
Visit 12+ wood Christmas trees made from scrap wood HERE
View all my other DIY Christmas tree ideas HERE
Check out all my unique Christmas decorating from one page HERE
Visit the entire collection of unique Christmas Tree Signs to make HERE
I love the herringbone tree!!!
Thank-you! It’s one of my favs!
I love your tree designs of previous years and this herringbone design, which is big, is great. I’m learning to pay attention to the scale of a wall and the sizes of items placed on it. To go larger is what really works with your new design. Love the way your mind plans and presents the design. You have a regular forest of trees for Christmas. 🌲I’ve pinned it and am going to go look at the stencil. It’s the icing on the cake of trees…😊
Thanks Joanne! Yeah, I love the scale of this one! It makes a fantastic stand-alone perfect for a front porch, or on a wall.
Just so awesome Donna! Love everything about this.
Great tip about taping along one side of your stencil to create a hinge. 🙂
Such a smart cookie!
Thanks Kim! Anytime I can get my special recipe mix of pallet wood in a project makes this junker mighty happy! haha
Love it, another great stencil design!!
Tania
Thanks Tania! I think the best part is it looks complicated to make, but it isn’t! WIN.
This turned out beautiful!
Thanks Cara! I’m starting to get quite the collection of wood Christmas trees at this point! Good thing they’re easy to store and I can letter up both sides! haha
What a genius idea using a stencil as a guide. I’ve tried both the eyeball approach and a proper measuring tape before, but it always comes out all muddled and off kilter.