If you love pallet Christmas trees, here’s how to create an easy 3D DIY pallet Christmas tree sign with the help of stencils and cedar strips for the perfect Christmas porch sign!

DIY Christmas trees are my jam! Any pallet project is really. However wooden Christmas trees are just so fun to make and a blast to customize!
Other DIY wood Christmas trees to make
Most of the wooden Christmas trees I’ve made in the past were cut from small wood scraps. No real need to take apart free pallets… I generally scavenge fence boards. Regardless, here’s a few of my favs!
Christmas Tree Seedling with hand painted details
Tree Seedling tree with 3D branches and tree trunk
Industrial Wood Christmas Trees
DIY wooden pencil Christmas Trees
Wooden Christmas trees in presents
DIY reclaimed wood Christmas tree for porch decor
Visit 12+ DIY Wood Christmas Trees to see them all HERE
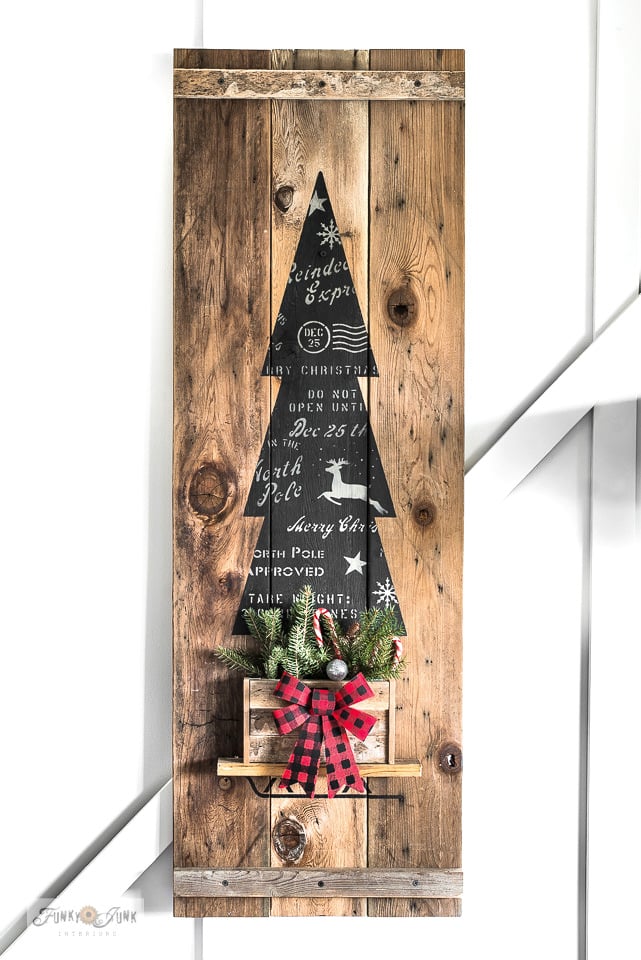
Wooden Christmas Tree sign with crate skirt
This particular Tall Christmas Tree in a 3D crate skirt was a much larger version, that worked perfectly as a front porch sign or Christmas art! And I’m even more happy to report, this project is one of my top Christmas posts!
Herringbone Wood Christmas Tree sign, pallet-style!
And then there’s the Herringbone wood Christmas tree I was inspired to make for the holiday season. Isn’t it fun? I love the look of wooden pallet Christmas trees without the major building that comes with it!
So since these were so fun to make, I decided to come up with a slightly different wood Christmas tree variation for holiday decor… pallet-style of course!

View Pallet Christmas Tree stencil HERE
Stencils used for this project:
Pallet Christmas Tree stencil
Pallet Christmas Tree is a 10-piece stencil kit that mimics the look of a real wooden pallet tree project… but this time, you can achieve the entire look with just paint if desired!
The pallet boards are actually separate stencils so you can also letter up your pallet planks with the greeting, We Wish You A Merry Christmas!
So when I designed this stencil, the first thing that popped into my mind was, “Those boards would look decadent if I used real cedar strips…” So that’s the size they were sized to!

View Mini Snow Flurry stencil HERE
Mini Snow Flurry stencil
To accompany the tree sign, Mini Snow Flurry, a repeating winter pattern stencil with tiny random round snowflakes, provided the perfect-sized snowfall for the backdrop!
The outcome of this sign turned out so cool! So if you too love the look of rustic pallet Christmas trees but building one from a pallet is a little overwhelming, here’s an easy way to get the look! With no splinters in sight.
Read on for the how-to tutorial.
This post contains some affiliate products in which I earn a small percentage from qualifying purchases at no extra cost to you. I only endorse products I love to use. All opinions are my own. If you shop Fusion Mineral Paint products through this post, you will get 10% off.
DIY Pallet Christmas Tree sign with stencils and wood
Supplies you’ll need:
Pallet Christmas tree stencil from HERE
Mini Snow Flurry stencil from HERE
3 planks of wood – my 3 planks measure: 5.25″ x 4′ long each
Fusion Mineral Paint at 10% off in Ash, Pearl Metallic Paint and Bronze Metallic Paint
Wider paint brush like this Palm Pro
Cedar strips measuring 1.5″ deep
Bosch variable speed orbital sander
Nails or screws

Cutting the pallet Christmas tree boards
1. Using a miter saw, cut planks a little larger than the stencil size.
- These planks measure: 5.25″ x 4′ long each.
- Combined sign backdrop size: 15.75″ wide x 48″ long.
- The stencil image measures: 9.5″w x 30.6″ tall.

Joining the boards with supports
2. Join the boards together with either a Kreg Jig pocket hole maker, or like I did with two small support boards shown in THIS wooden Christmas tree sign.
These support boards can be placed on either the back or the front of the sign. I chose the back this round.

Painting the wood Ash
3. Using a wider paintbrush, paint the boards with Fusion Mineral Paint in Ash.
I only needed one coat.
This is a deep charcoal colour that resembles a softer black. It is perfection to make those soon-to-be wooden branches pop!
View Pallet Christmas Tree stencil HERE
Positioning the stencil on the boards
4. Position the Pallet Christmas Tree stencil in the middle of the sign boards, holding it in place with masking tape.
Set the small board stencils with words to the side for the time being. We’ll use them yet!

Stenciling the Christmas tree details
5. Stencil the star, center of the tree and tree’s base in a mix of Fusion’s Pearl Metallic Paint and Bronze Metallic Paint.
Star and tree stand: The star and tree stand were stenciled in Pearl first, then Bronze was added to the stencil edges to distress them up a little.
Tree post: The middle tree post was stenciled in Bronze first, then lightly highlighted in the center with Pearl. This gave the post the look of a metal pipe!


6. Before removing the stencil, gently swipe the edges of each stencil board image with a little paint leaving a faint outline of the Christmas tree features, so placement for the cedar planks is easily done.
Instructions for flawless stenciling:
- Load a dome-tipped stencil brush with paint.
- Remove most paint onto a rag until brush feels dry.
- Tap paint through stencil for desired effect and coverage.
Learn more about how to stencil from THIS POST.

Adding cedar strips
7. For a rustic look, cut 9 pieces of cedar strips slightly longer width-wise than the stenciled board images so they completely cover the tree shape stenciling.
I like dry-fitting the planks to check the measurements. They really do make the perfect addition!
You could also angle the edges of the boards if desired!
You could also add wood stain to the cedar strips if you wished to make them darker. I left mine natural.

Stenciling Christmas words onto the cedar strips
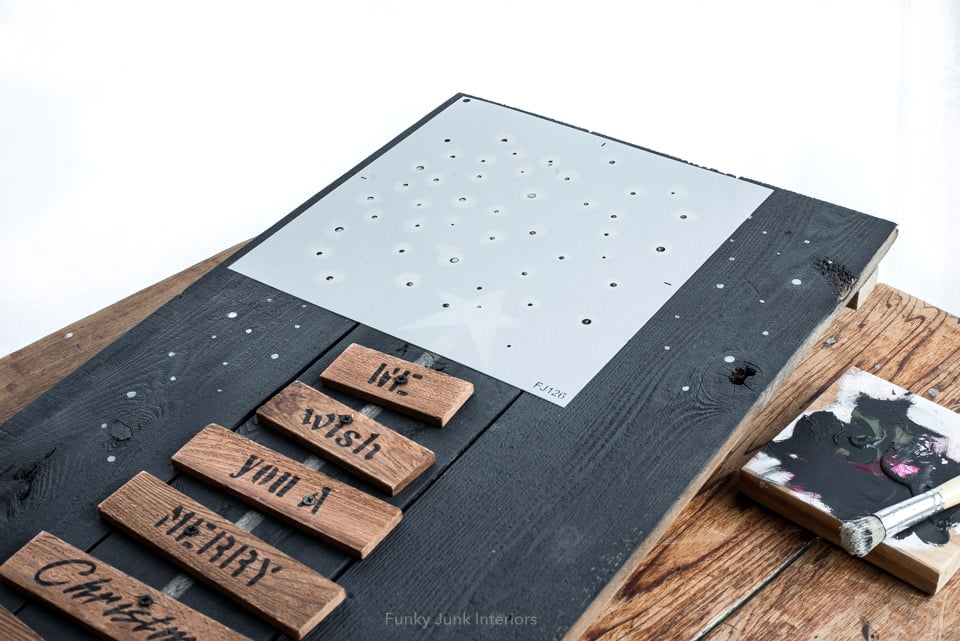
8. Position the board stencils with words onto each plank, then stencil the words in Fusion’s Ash so they really pop against the wood!
View Mini Snow Flurry stencil HERE
Adding snowflakes to the background
9. Attach each cedar strip to the sign board with 1 screw, attempting screw placements that work with the words. (ie: dotting the i’s)
You could also use brad nails, wood glue or hot glue to attach the strips.
10. To add a snowy background, position the Mini Snow Flurry stencil on the dark background, and stencil with Pearl Metallic Paint.

Move the stencil around and add additional snowflakes were desired to cover most of the top of the sign, fading to no snowflakes about half-way down.
Are you even ready to see how adorable this Christmas tree sign turned out?!

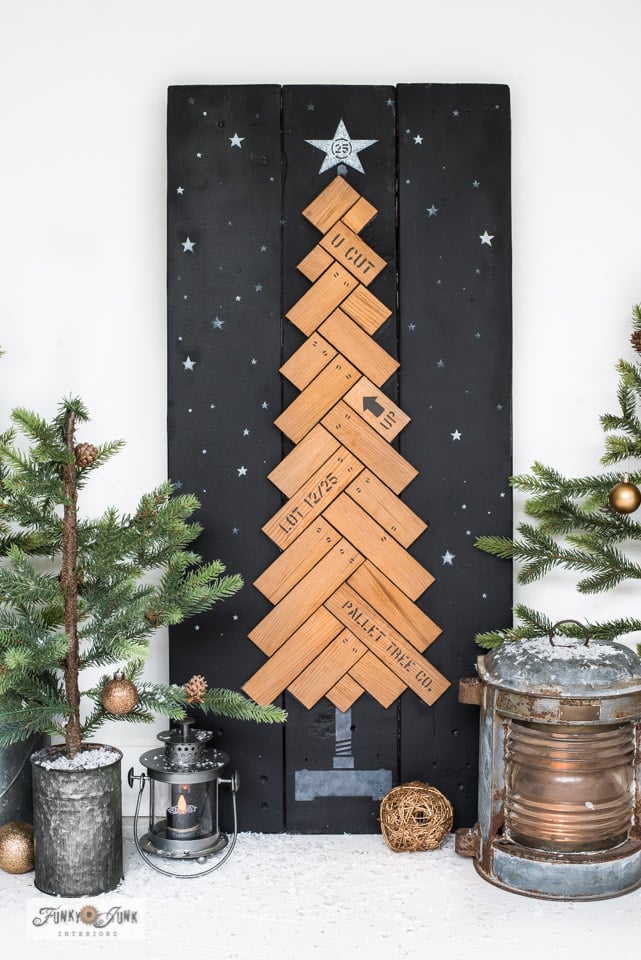
The finished DIY Pallet Christmas Tree porch sign!
I’m just smitten with the finished pallet wood Christmas Tree sign! It’s such an easy way to get the wood pallet Christmas tree look without all the work of building a traditional one that stands on its own!
To style it up as a porch sign, I added a vintage crate filled with pinecones at the bottom of the tree. An evergreen branch with the tiniest attached pinecones was draped above the top of the tree. Then copper ornaments along with deep blue ornaments were hung from the top branch and tucked among the pinecones.

The Pallet Christmas tree sign looks great on my porch! I simply pulled together a bucket filled with more evergreen branches, plus a small faux Christmas tree with a little faux snow to complete the look which compliments the dark front door, woodsy screen door and brick perfectly!
This Christmas sign would also be incredibly nice as gifts, or to host a workshop making them in groups! Who needs a real tree when you can create with wood that lasts forever?
And of course, the decorating options are limitless on how to decorate this rustic Christmas tree the whole family can be a part of! Here’s a few more ideas:
![]()
Have any left over slats? Create stacked Christmas presents at the bottom of the tree like I did with this Chevron Christmas tree sign!
Other Christmas decorations to consider:
- Hang fairy lights like garland, or Christmas lights along each scrap wood branch.
- Attach small Christmas ornaments between the wood slats.
- Rather than use the cedar strips, simply paint the board stencil images with a taupe colour to resemble wood such as Milk Paint by Fusion’s Almond Latte like in THIS pallet Christmas tree farm sign.
- Create more than one for your own forest
- Add little hooks to hang decorations
Tutorial Video – Pallet Christmas Tree how-to!
.
Visit above to watch a short video on the easy 3D Pallet Christmas tree process!

All that’s left to say is, yay, my front porch is decorated for Christmas, pallet wood tree style on full display for the entire neighborhood! Let the holiday cheer officially begin!
Now it’s time to get busy with decorating the inside…
Think you may try your hand at making some pallet-related projects or rustic yard decorations of your own this season?
Check out many other similar easy DIY pallet Christmas trees you can make HERE
Easy DIY pallet Christmas tree sign with stencils and wood
Supplies:
Instructions:
- Cut planks larger than the Pallet Christmas tree stencil dimensions. These planks measure 5.25" wide x 4' long.
- Join the planks with either a Kreg Jig or smaller horizontal board supports screwed in from the back.
- Paint the boards in Fusion's Ash.
- Position the Pallet Christmas Tree stencil in the middle of the boards.
- Stencil the star, tree post and tree stand.
- Gently swipe the edges of the tree boards to leave a painted impression to help position the cedar strips.
- Cut cedar strips slightly longer than each stenciled tree board.
- Stencil 'We Wish You A Merry Christmas" words onto each board as shown.
- Attach the cedar strips to the sign boards with screws or glue.
- Add a snow backdrop by stenciling Mini Snow Flurry stencil, heavier on top fading to nothing towards the bottom.
- Decorate the porch sign as desired!
Donna,
Love all your trees!
This is so cute! Where do you get the cedar strips?
Joy
Hi Joy! You can generally find cedar strips at most hardware stores. Any slim board will also do!
Ok, thank you. In looking at your supply list, there is no Cedar strips on it? Does it come in a roll or individual? You mention in your instructions to cut it. I have no idea what this is. Sorry for so many questions.
Cedar strips are generally sold by small bundles. If you inquire at a hardware store, hopefully they can guide you!