
How to make old signs… with a GROCERY stencil!
Old or antique signs are huge in home decorating these days!
While they’re cool to find, they’re even more fun (and easy) to create! Here’s how to make old signs, with this one being a multi coloured old sign from a board found on the curb.
Here’s how!
How to make old signs…
with a GROCERY stencil!
About the stencil
.

Update: Due to popular demand for all things old signs, Funky Junk’s Old Sign Stencils are now avail so it’s super easy to make your own old signs from my own designs!
See Old Sign Stencil projects HERE
 Grocery is available in stencil format HERE.
How-to:

1. Find an old board on the curb no one wants any longer.

2. Pick an acrylic craft paint colour that’s a little on the bright side.

3. Once dry, go over the paint with a colour a little on the deeper side to help tone it down.

4. Create a decal (made with my pro signmaker equipment – Graphtek cutter and Signlab software) or stencil as most of you would most likely do)

This GROCERY stencil is now available from HERE

Using a vinyl stencil
.
5. Center the decal, then create a tape hinge on one side.

6. Lift the decal and pull out the backing. Then burnish (rub) the decal onto the surface via a hand held hard edged squeegee (credit card works too)

7. Pull off the premask. (top paper)

Painting
.
8. Paint inside the stencil/decal. Follow the letters with your brush as if they were hand brushed on for a realistic brushed on look.
9. Remove the blue decal/your stencil, leaving the freshly white painted letters. (not shown)
10. Distress the works with a palm sander so bottom coat AND some wood background shines through. (not shown)
How to add multiple distress colours
.
Another distressing technique: randomly place masking tape all over sign and pull off before paint is fully cured. (pulls clear to wood in some places which is neat)

Adding sign details
.
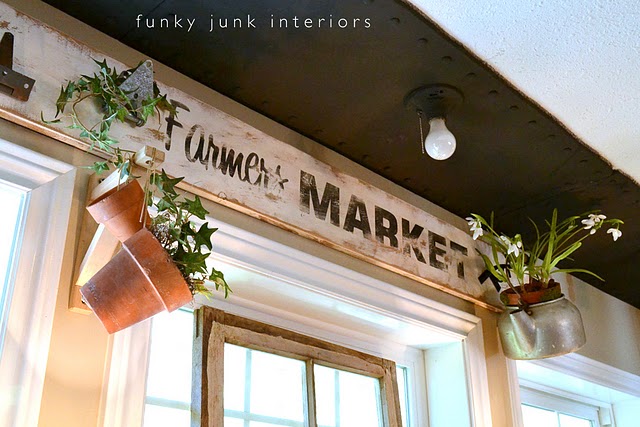
10. Decide on jewelry. Hmm… what shall it be today? I love using old hinges and brackets to add old world charm to signs.

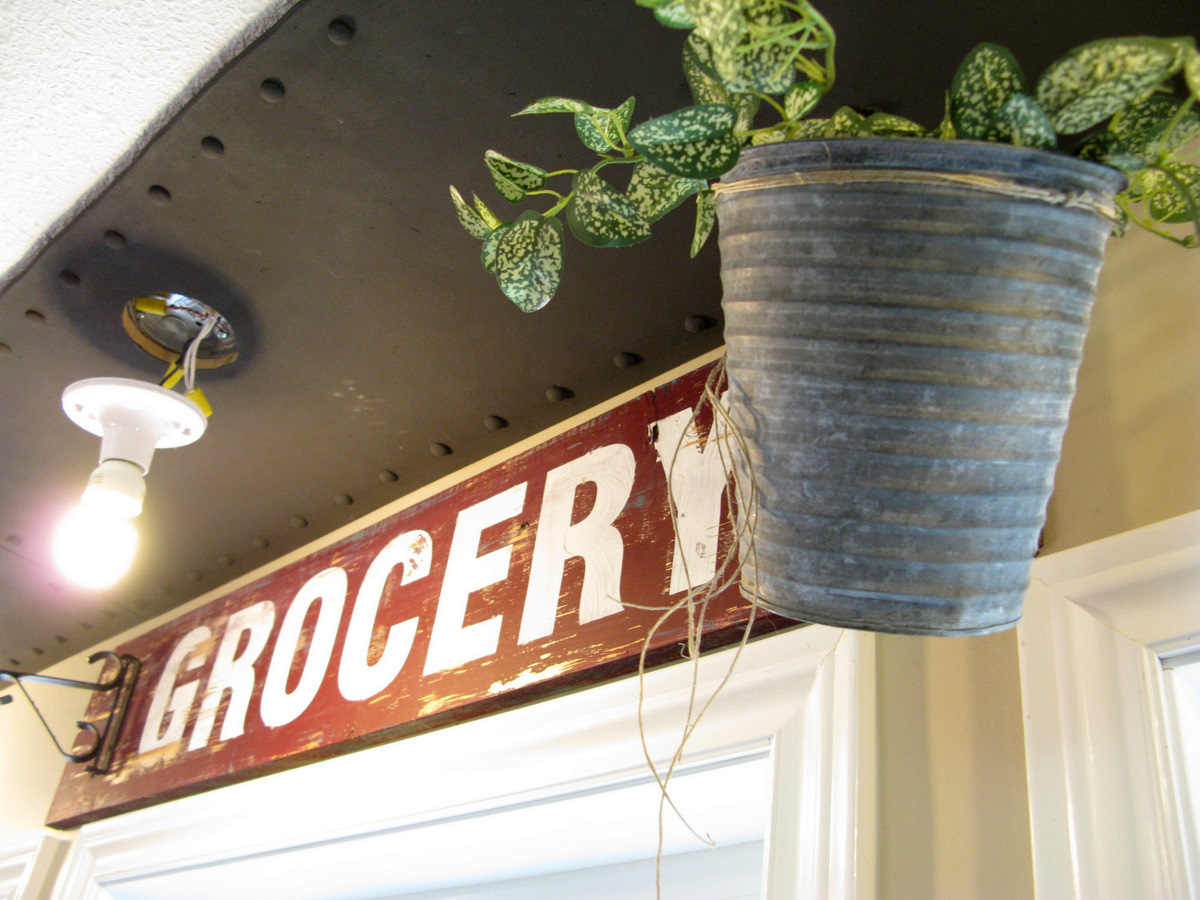
Two shelf brackets were added to both sides of GROCERY for a little junky styling, as well as hanging potential.

Isn’t that a beauty?!
Love the multiple paint tones from the distressing peeking through!

I also like how some sections got right down to the raw wood.

So let’s hang it up in the kitchen!
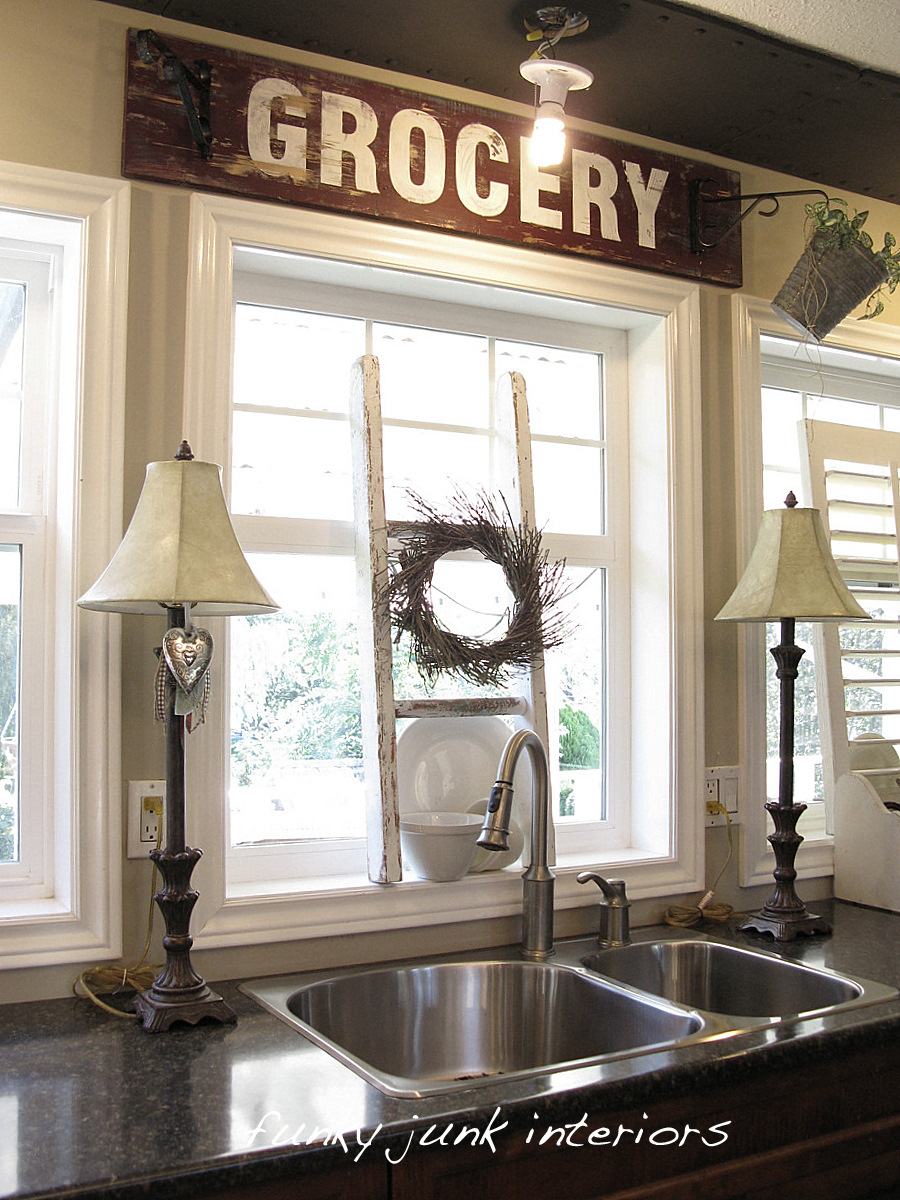
Wow. What a fabulous statement piece this GROCERY sign turned out to be for the kitchen!
Toned right down to a nice deep cherry coke kinda red indoors.
(lights in kitchen were finished after this photo shoot… naturally…)
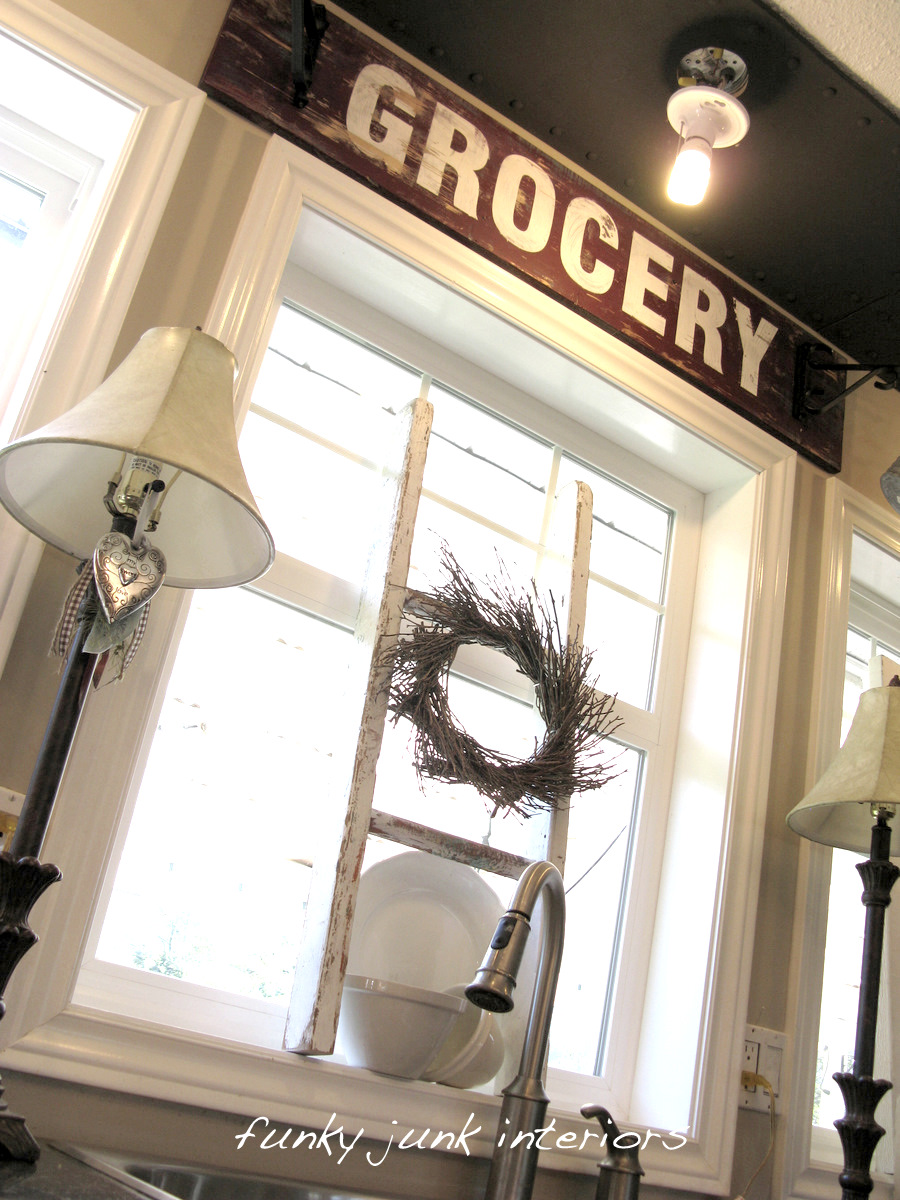
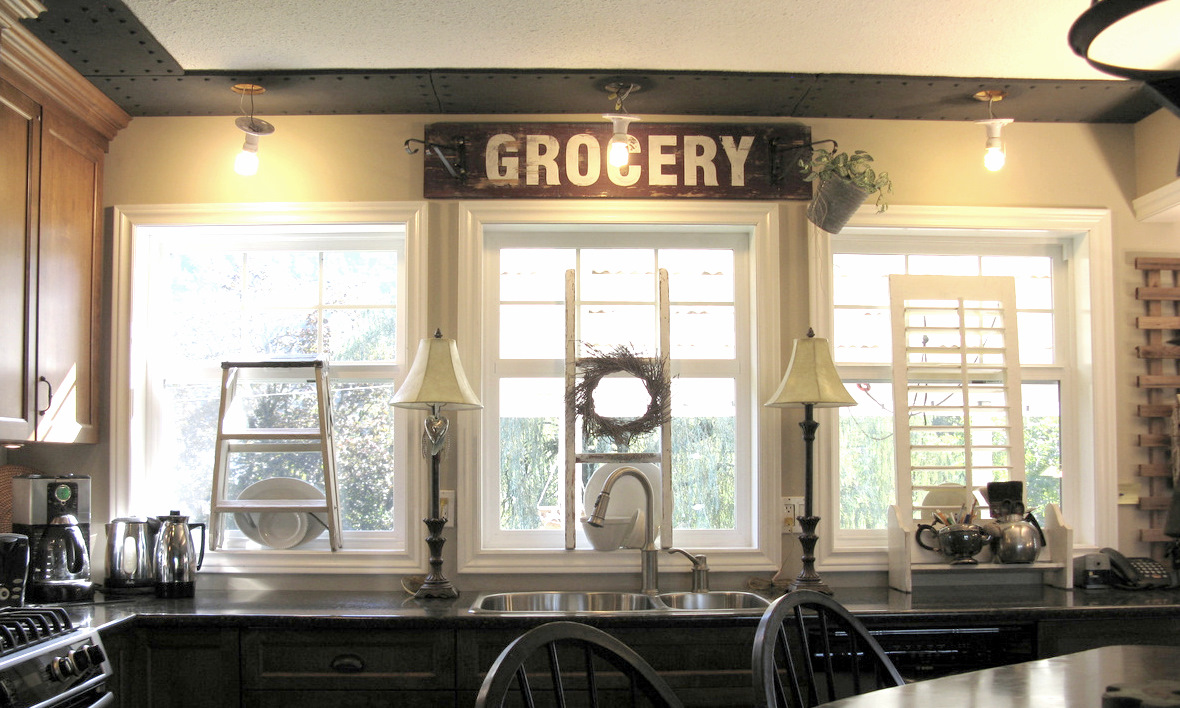
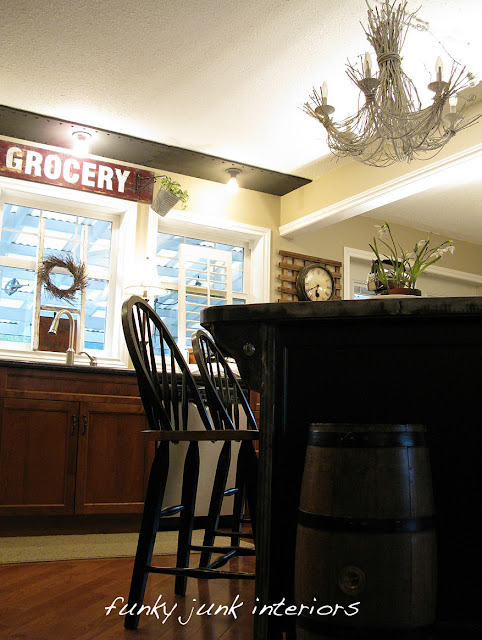
This distressed GROCERY sign adds a pop of old world charm to this kitchen space. It’s just right!
Think you’ll give one a go for your own home?
Other sign related projects you may enjoy:
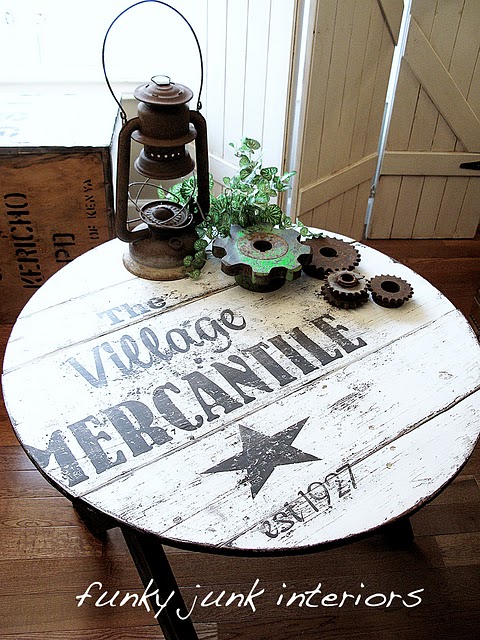
Village Mercantile memory table


featured in the June 2011 issue of SignCraft Online.
That would be fun to have a sign linkup. I’ve made a couple but they don’t look as good as yours since you’re a professional. They were fun to make though. I made one that was personalized with our last names so it looked like family company sign. Thanks for the tip on the masking tape. I’ll have to try that.
COOL sign! I love reusing old lumber. If you know where to look you can get a bunch of it for free! Can’t beat that:)
Oh how I LOVE signs! Thanks for sharing your secret recipe. I can’t wait to make some…. just need to find one of those boards on the side of the road. 🙂
Words I’ve considered for signs: Lunch Counter, OPEN, General Mercantile and Live Bait.
ooh i LOVE that sign! and your kitchen! and the ladders and shutter in the window! and everything you do!!!
hmmm…i like the word simplify. but i also like farmhouse or porch (just in case someone comes to my home and doesn’t know) hehe.
and i need to get my work done this week so i can sns with shutters…cuz i love me some shutters!
judi 😉
Wow, that really looks authentic! Is that a common font that you used? I really like it!
I love your sign with all the great color! If you have a minute take a look at my latest sign made out of old fence wood and you can see the word that I picked.
http://kinserhome.blogspot.com/2010/10/simplified-entertainment-center-with-my.html
Amazing sign! You are very talented….I am still using carbon paper for my signs.lol
Ciao Rita mammabellarte
I love it!! I am just starting to try my hand at signs and this came at a perfect time! Thank you so much! It looks great over the window like that and you colors are perfect!! 🙂
I love this! But I’m so bad at stencils.
Love it! I’m a sign freak.
I love your sign Donna! It looks all fabulously worn. I want to make one that says “simplify” since it’s my mantra, lol!
Shutters sounds fun! Can I use my old hall tree or do you want new stuff? I need to get to the Restore to see if they have any.
great sign…wonderful size too. so many are small and this makes a great impact.
OK seriously, you may not believe me because I say this at least once a week to someone out here in blogland, but I am going to make this! Really, I’m sure. Not the first date, I’ll call you kind of sure. Really sure. Now I just need some words. I hope your readers come up with some good ones! Lisa~
I know this post is about your sign, but I LOVE that ladder in your middle window. I wonder if I could make one like that.. hmmmm. Ideas, ideas.
I’ve been wanting to make a sign that says: We may not have it all together but together we have it all. I have that stenciled on the wall but it’s very sloppy. I’d like it on a slab of wood much better. I love what your sign says.
I like Gina’s idea for a sign linky party!
Such a wonderful tutorial! Your sign is gorgeousness!
Have a Wonderful Day!
BEautiful Donna….LOVE those brackets you stuck on there. How cool are they? Very.
I made that “peace” sign, but my daughter stole it for her apartment 🙂 I’d like to make another one sometime, but I’ve got lots of other projects in the works that need attention first. I’m sure I’m the only one with *that* issue lol!
I’ve been collecting drift-boards I find along the Mississippi River. I’m getting a pretty good collection and will soon be doing some signs.
And there is always my “Over Size Load” sign. ;-D I’ve figured out what I’m going to do with it… now I just have to work thru several “gitter dones” to get to the point I can do it.
Hmm… I do have a sign in my kitchen. It says, “Don’t Forget Dessert!” I distressed it but after looking at this post I’m thinking I could take it a little further. Thanks for a great tutorial! 🙂
I love the sign and thanks for the tutorial.The splash of color looks wonderful. I think I have the opposite of colour-phobia. What would yo call that? Thanks for all the definitions, it helps slow folks like me!
I love your signs. I’ve been in sign mode for awhile because I have a craft show coming up in Nov. I have to trace by hand onto carbon since I don’t have the professional supplies. Your way looks to be so much faster!
Very. Cool. Sign. I will tuck this into my files for later. Thanks for another great tutorial!
Hey, Donna…have you considered selling your decals?
Hee hee hee… I’m loving Teri’s “Over Size Load” idea for a sign! 🙂
I LOVE this sign, Donna!
I loe ti! Thanks for the tips 🙂
I wanted to say .(
I love it! 🙂
Wow… that was almost pain free. What a great tutorial. It looks perfect in its place. Love it!
Wow! Love that sign! That would look so good in my kitchen! Thanks for sharing.
yumm love everything about it, I love the red and turquoise together, and esp. the finish. Looks great in your Kitchen! what a great pop and focal point!
It is beautiful!!
Thanks for that Donna, you gave me the inspiration to get on and complete my furst sign…one I started months ago, lol. I just did a blog post about it, and gave you a mention of course 🙂
xx Karen
ps. that colour change once it is inside, is AMAZING!
Thanks for the ideas. I have made a few signs with weathered fence pickets, and a table too that I love. I am looking for ideas for making a sign to go above my authentic working pay phone. I can’t wait for your sign linky party, sounds like so much fun!
Still waiting for the day that you make anything I don’t like. Waiting… but not counting on it!
Love your sign. I have the perfect spot for a sign like that in my kitchen. If only I had MissMustardSeed’s lettering skills or your cool equipment.
Cool post, very cool post. Oh and I tried to leave you several comments on past posts yesterday but my PC wouldn’t let me. Just know I read them all and loved them (as always).
Hi Donna, This is a great tutorial!! Love that sign . . . and your grain sacks!
~ Julie
p.s. Just took a step back in time on your posts about the blog critiques. Since I’m still a newbie;
feel free to visit and critique my blog 🙂 ~ would love your input.
Love love love the newest sign! The process and the finished product is fabulous!!!
How about “FRESH EGGS” as a new sign. Or have you already used that one?
Thanks for sharing process!
Hugs
SueAnn
It looks fabulous, love the colours and perfect spot for that… I love your tip on the masking tape… I will have to try that next time I am distressing.
I made a sign when I moved into my house 6 years ago that is still a big hit… “HOME IS WHERE YOUR STORY BEGINS”.
Hugs, Deb
Fantastic sign. Having the ability to cut your own graphics is the way to go. I think the color choice is great. Just the right touch to add a little something to the room.
And yes I would love to know what’s that banding around the edge of your ceiling. Interesting.
As for other signs,
Soda Pop 5 cents (with the old cent sign instead)
Theatre Box Office
Metro
Honeymoon Cottage
Campground (with an arrow pointing the way)
No Loitering (especially good for a shared bathroom Lol)
Office
Just a few off the top of my head but I’m loving the idea of “wide load” mentioned above.
Love, love, love this!! I love painting on old wood!! Barnwood is my fave…but I don’t paint the surface I leave it all rustic like! 🙂
i love it!! great job!!!!
what little “doo-dads” do you have hanging on the lamps? i love the look!
My favorite sign saying is “A clean house is the sign of a wasted life”. It hangs above the doorway in the kitchen and pretty much says it all!!! I have a vinyl cutter too and make tons of those distressed signs. Barn wood is my favorite.
Coming back to play around your site a little and I noticed your ceiling border!!! What IS that?? I love it.
Love it!!!
*hugs*deb
so great! I love the pop of red (kinda unexpected for you!!) 🙂 the graphic bold letters are awesome. What a wonderful diversion your blog is to me!
omg…I’m totally going to take a picket from my fence and make a sign…today! Hubby won’t notice and family dog too fat to squeeze through.
It’ll work!
WOW! I love that tutorial!!! thanks!
Yes! Wow!! I think it came out great too, looks like it has some authentic age to it. You are very patient to do that though, a lot of steps. I love your kitchen window Donna, it looks really pretty, in a Donna Junk kind of way!
Perfection! I’m hooked to your blog!
Love the sign. Hope I can make one to look as good. Sometimes I don’t follow instructions very well. I have a sign in my kitchen for my grandsons that says “No Whining”. Doesn’t work but hey what can you say, they’re little men. Love reading your blog. Kathy H.
Very cool, Donna. I love the multi-layered paint effect. Nice work!
I love your sign – the pro sign maker equipment has me very jealous at the moment! I just saw a very cute Halloween sign that was a on a picket fence post “WITCH WAY” I am going to try one for my walkway. All the best, Lori
Looks great Donna, I love it!
I like BAKERY and FRESH EGGS.
Step 8: After you pulled off the decal, the Grocery part was dark red and the part around it was blue. Then you showed lots of white paint over the whole thing. What happened to the blue? I am not very artistic brained and need step by step instructions. You really glossed over the “stencil” part. I haven’t used a stencil in over 30 years. Can you elaborate? Thanks Ann
#55 Nutbird, sure thing!
#7 is the decal with the sign board shining through.
#8 – paint inside the blue decal letters.
AHA! This is the part I missed.
#9 – remove the blue decal leaving the white words (the blue decal is what I am referring to as a stencil)
#10 – distress the works (red sign board and white letters you just painted)
I hope that helps to clarify. Sorry for the error. I’ll go fix the post now.
Donna
Hi Funky Junk!! I’ve been lurkin ya for a month now and I saw the post you did on the ‘decorating for your kitchen window’ I LOVED IT! But what I really fell in love with was the black ‘trim with nailheads’ you had around your ceiling!! AWESOME! I HEART, I mean really H.E.A.R.T. nailheads! I use them all the time in my work, my wall finishes, around trim, in upholstery! I will have more pics to post soon on my blog http://fauxrealdesigns.blogspot.com/ I think I’ll dedicate a week just for the love of nailheads! I love your ideas and your style!
Thanks for sharing with all of us!
Jennifer
The sign looks fabulous over the kitchen window, especially with the black hardware. For sign ideas:
Open
Fresh ___ in season
Reading Room
This Way to ________room
Great sign I love the colors and the old plant hanger is a great touch! Thanks for the inspiration!
Your sign turned out great and looks perfect in your kitchen. Thanks for the tutorial!
Love this. I get the bright color thing.
Love the hangers attached to the sign.
And sure, I’d so a sign for SNS! (trying to dig out some shutters right now, tho!!!)
~K
is your lite above the sink supposed to look like that? not a critique. I’m just curious!
Haha, it wasn’t done yet!
love it! I love the cottage-y look of the sign and the ladder in the window. super cute!
THANK YOU for this tutorial, Donna! What beautiful work you do, girl!!!! I’ve been eyeing a piece of wood tucked away in my basement for such a project, but just didn’t know how to go about it. NOW I know! 🙂 I’m bookmarking this page for my next project time! I have to ask too – have you considered selling your stencils? Just a thought…. 🙂
xoxo laurie
Oh….how about these ideas for words?
Dream
Believe
Faith
Cottage
Farmhouse
Beach
Summer
Porch
xoxo laurie
I love this idea. I’m not sure if I’m brave enough to try it but I’d like to.
Stunning! I want to take on making signs next… I have a lot of crappy wood in the garage from curb finds.
The sign is great! Love the color. Thanks for the inspiration.
#64 Laurie, yes, I’ve thought about selling the stencils. I just have to rig up a way for them to be price efficient enough. When I get my sign division up and running (IF LOL) I may include stencil options as well.
I’m still trying to figure out what I want to do if I grow up. 🙂
The lights will be delt with one day soon. When I find something I love.
Donna
If you do decide to sell the decal…I definitely want some! I’m horrible with stencils. Working on a project now and I’m so worried I’ll screw it up!
Gaahh! – how are you living with all of that color?! Those rotating plant hangers are kilin’ me. Wonderful job, girlfriend :).
Love this a lot! Thanks so much for the how to instructions.
Love this Donna ~ I like one word signs ~ Believe ~ Breath ~ Imagine ~ Home ~ Memories… you know the cheesy normal ones. Have you ever thought of doing up custom decals and selling them here on your blog or do you already?? Would it be worth your while or would it be too costly to pack and ship? Just wondering…..
I am super late in finding your blog but I found it via Be Diff Act Normal. I have to say that I am OBSESSED with old signs and totally love this project. Also, your kitchen makes me extremely jealous!
I love your signs so much! Thanks tons for the how-to, I’ll be linking.
I absolutely need a red, white and black sign that says Grand Central Station…. because my kitchen in progress has six doorways – one double wide – going through it. Such a busy room.
I’d like an ‘order here’ sign by the stove, and in laundry: Self Service. 🙂
One of my favorite signs of all time was at an antique shop:
We buy junk, we sell antiques
I also like any “kitcheny” ones like, lunch line.
Beautiful! I love it.
Loved your sign and it goes great with your already great decor.Would love to do some signs myself.Could you tell me what kind of pro sign maker you have and where i can get one?Anew loyal and jealous follower……Greg @ http://handmadecraftsbyzz.blogspot.com
I love your kitchen windows Donna, that is so awesome! So much light!
Great post Donna – I linked it on my blog too.
Thanks so much for the link Donna!
Donna, what a great sign and love the details you shared. You rustic decor is wonderful! I’m inspired!
Hi Donna,
I just wanted to thank you for the daily inspiration! I made my own version of the Grocery sign, using some of your techniques! I really enjoy reading your blog!
Robin
so cool, thanks for sharing!!!
Awesome! I used this tutorial and linked to you!
http://lifecraftsandwhatever.blogspot.com/2011/02/vintage-name-board.html
Hi Donna 🙂 You know I love this! I don’t do features too often on my blog, but I did today and included your post. Thanks! http://www.craftsbyamanda.com/2011/03/13-vintage-signs-for-project.html
Great job! Your vintage sign is so cool! For me, vintage signs give that rustic feel especially when the theme of your business has a touch of classical approach.
WOW, you are one popular gal!
Love the sign, signed up to follow.
I am pretty good at stenciling, “it was the thing”
in the day. Don’t know how/where you get your letters.
look forward to hearing where i can get the letters, or make them.
Thanks,
jan
This is so fantastic. I think this tutorial would be perfect for anyone who’s planning a farm wedding and wants to create those rustic styled signs. Thanks so much for sharing!
http://www.ilovefarmweddings.com
I absolutely loved your sign! I love signs, Old, Repro, Metal, doesnt matter much to me, as long as they are quaint, and speak to me. I have spent a fortune on signs….Canton First Monday, or internet, (when you can find what you want). Light bulb goes on (after reading your post, of course) Why did it never dawn on me to make my own? Ive seen all the Dream, Live, Laugh, Love, and Believe signs I can handle. Not that they arent great……but nice to have something “zingy” as well. Ive actually been looking for some time for a sign that reads: “I WANT TO BE A COWBOYS SWEETHEART”…..which has been impossible to find. Is this really so far out? Not that it matters……I WANT IT! AND I WANT IT NOW! LOL
Im so happy I found you. I was just thrashing through JUNK, on the internet, and there you were! Thanks so much for your inspirational, and fun ideas! Debbi
I only signed in as anonymous, because Im on Yahoo, and dont know which to choose to post! Help!
HI…and Thank you for such a great blog!!
I am a fellow junker and am so enjoying this new hobby of mine.
I have read you posts about making old signs but I didnt see where you actually described the software/program/equiptment that you use for your lettering.
I am currently using stencils but I cannot get the variety I need…Help!
Mimi
Hi, just saw this over on tipjunkie….you do the coolest stuff! The colors look great & I love your idea of putting masking tape on & peeling off…never thought of that. Thanks 4 sharing!
Very cool! I was going to buy a sign, but maybe I’ll just grab a piece of wood from the basement and do it myself 🙂
What type of signmaker equipment do you use?
Gosh you’re amazing!! did anyone ever tell you that?? lol …thanks for sharing Donna…so love what you do. Wish we had wood of any kind lying around on the sides of the road down here in NZ..we don’t do that curbside “recycling-come-and-grab-what-u-like” kinda thing…sigh!!!
Love looking at what you do tho…gorgeous!x
Love to make signs and subway art…..I cut my stencil with my Cricut and use contact paper….works great!
Thanks for all of the great ideas!
I love your blog, thanks for taking the time to show us how do make beautiful items!
For this sign you said you used “signmaker equipment”. I have been looking at the Cricut and Silhoutte, are you using one of these?
Since I don’t have a way to make my own vinyl labels for this project what do you suggest? Make a stencil out of what? Eager to learn. Thanks!
Donna, You are amazing. I love your style and I am so glad you are willing to share your talents and ideas with the rest of us so we can maybe try it too! I just love your “old” grocery sign, so I put it in my linky list on my blog post. I know everyone who comes through my site will think it is amazing too! Come over and check it out!
Trisha
re-madejustright.blogspot.com
Donna, I LOVE your signs! Great blog and “how-to’s.” Thanks so much for sharing!
Thanks for a great blog and the sign tutorial. My sign suggestions would be “No Cooking, Too Good Lookin” or maybe “No cooking, just looking” Of course, there’s always the good old southern classic “Ya’ll come back now” I would definitely buy your stencils if you decide to offer them Donna. Thanks for sharing!
Nice Art…! i think we all have to do something like that for our kitchens.. If we have a time to spent on this…
I made this! Thanks for the tutorial!
http://alittlesplashofyellow.blogspot.ca/2012/05/diy-vintage-sign.html
Thanks so much for this tutorial. Thanks to your inspiration, I made this: http://jules138.blogspot.com/2012/05/we-have-sign.html
What kind of “pro signmaker equipment” do you use for the decal?
I was also wondering what kind of sign maker you have.
What a great sign! Love it!
Hi Donna!
Where did you get your sign making equipment? I now have an antique mall space and the signs that I am finding are too expensive for me to make money on and I don’t mind making them but am VERY lame at making/using stencils that aren’t already arranged for me. Any help would be much appreciated! thanks! karen…
Can you direct me to the ebook? Also I do not understand what you meant on here about brushing over the the decal/stencil to leave white letters because the picture before showed that you put black letters on it by rubbing them on??? I am confused, I would like to try this can you give more detailed directions and what machine do you use?
Hi Carol! The book has not been published yet, my apologies! I plan to have it complete by the end of 2013. I’ve updated the post to also reflect that.
Regarding the white letters… when you place the stencil down, you paint the letters white. When you lift the stencil, the white letters remain. I hope that is worded better! 🙂
Hiya. Love your GROCERY sign. Do you use ‘Dry Rub off decal paper?
Hi Linda! I use sign grade vinyl any sign shop in your area would carry. It’s really meant for vehicle lettering but works fab for this too!
Love it! Looks great! Nice kitchen!
My husband (a better cook than I) took over the kitchen. I would like
a small sign that says something like “Blue Plate Special” or “Lunch
Special”. Hopefully, I can get him to help me as we have some distressed wood lying on the side of our house for quite awhile now. I’m inspired.
I love all your Art Work… I have always been a very creative person but had a very tough stressful job for the past 25 years, I haven’t been working for over a year now, and I’ve found I am enjoying my creations more and more everyday… Thanks for your tips, I love unusal Art…
Thank You for Sharing your unique skills and creativeness.
I love your signs. Thanks for the great tutorial. Do you happen to know if there anything special about using acrylic paint or would latex work as well? Thanks.
Hi Brittany! Sorry, just saw your question now. I used craft acrylic latex paint. The paint needs to be thick enough, but I’m a believer in trying out any paint you may have on hand. What can it hurt?
I love your work, especially your chandelier. And it looks so easy!
I appreciate your post. Thanks, Tracy
I found your blog, Not the first time mind you!, while researching wooden sign how to’s ………. I love your kitchen windows! Can you tell my the width of the individual windows and the width of the 3 together Please?!
Hi Edie! Each window opening is 34″ wide, and it’s 10″ in between each window from opening to opening. So that’s 34″ x 3 + 20″ = 122″.
I want to know how to attach metal objects to my signs such as bolts nuts and various old metal objects, too heavy for glue. I have several buckets of metal prices found on our old farm.
Hi Rebekah, my first guess would be to weld them, however that isn’t easy if you don’t have a welder. Ask me how I know. I’m sure there are some heavy duty building glues you could purchase. I’m not sure what to suggest other than ask a hardware store what they’d recommend. Maybe something you need a caulking gun for? Hope you can find something!
can you explain what you mean by , lift the decal and pull off the backing ???????
Yes! A decal is a cut image on a paper backing. You must apply a premask over top to lift the image.
When you go to apply a decal, you must grab the premask, remove the paper backing, then apply the decal to the surface.
I hope that makes sense? The pictures do more talking than I can. LOL
I love your old signs.also would like to know how you write on fabric? also what do you use and how do you do it I would to do a chair with some writing
on i.could you tell me how to do it I would really appreciate it.
Thank YOu,
Suzanne
blackcloudros1@aol.com
Hi Suzanne, I’d just use a stencil and do it direct on the fabric. Never tried it yet on an upholstered chair but I want to. 🙂
I want to make a sign with old hardware for my husband and I am wondering do you know how to attach the old hardware/screws etc to the board. Thanks so much. Love your work.
Hi Laurie! To attach hardware to boards, predrilling a small hole first is helpful to avoid splitting the wood, then I use a drywall screw for the final attach.
Was there a specific hardware question you had?
I want to make a sign Andy’s John Deere Muesum for my husband for outside his shed where he houses his die cast collection. I want to use some old tools to form letters I picked up from his work but not sure how to attach them as they have no holes to put a screw through. Thanks so much for getting back to me.
Ohhhh I get it now! That’s a tough one. I’d suggest to visit the hardware store and look at mounting options. Brackets, glue, anything to get the job done. It isn’t a usual kind of project so this one will require some massive creativity!
Hi can you tell me what the name of the font you used for the grocery sign? Thanks 🙂
Hi Val, I don’t remember off hand, but I do sell the stencil now. 🙂 You can find it at / http://funkyjunkinteriors.bigcartel.com/products
Is the “decal” actually vinyl that you would use in a vinyl cutter? Great tutorial !
Hi Marty, yes! You just do a reverse weed on it. (removing the letters instead of the background)
These days I offer stencils so anyone can copy my sign designs. You can find the current ones at: http://funkyjunkinteriors.bigcartel.com/