Transform a plain pedestal side table into a stunning statement piece with this 2-toned wood grain and painted makeover alongside an Antiques stenciled sign on top! This adorable pie crust table now has an upscale real antiques look!

As a Fusion and Amazon Influencer, this post contains affiliate links in which I earn a small percentage from qualifying purchases at no extra cost to you. If you shop Fusion Mineral Paint products through this post, you will get 10% off. Thank-you for helping to support my blog!
I made a mantra that this would be the year that I’d not just find / purchase and stock furniture finds, but to actually do mini furniture makeovers on each and every one so they too can shine! And of course, so I can put them to use and enjoy them in their revamped state! I just love a good furniture makeover. Here’s a few of my personal favorites…
A few favorite furniture makeovers:
pallet-style side table with log storage
fabric pattern stenciled dresser
So today, I’m sharing a quick and simple makeover with a dash of fun, thanks to a recent free furniture find right from my own neighbourhood…
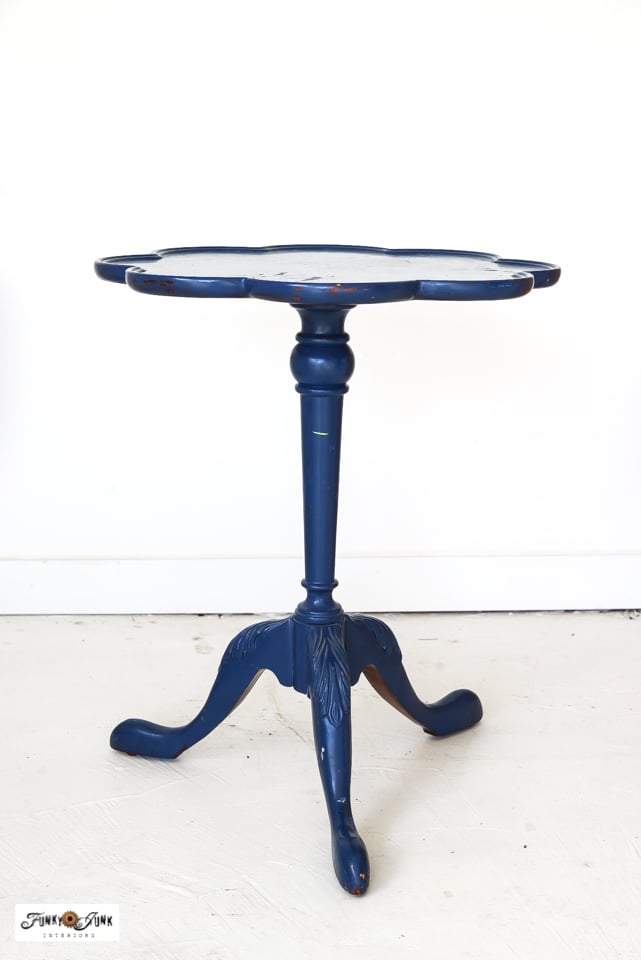
I recently landed this enticing table painted a deep shade of blue. It was in need of either paint stripping, repainting or both.
While this particular pedestal end table wasn’t an antique, I felt its decorative looks and classic, clean lines resembled that of a quality furniture piece! A reproduction vintage pie crust table if you will.
However the height and width was the perfect TV tray size! So I was sold.
As far as I could tell, the furniture construction was not veneer nor particle board, and appeared to be solid wood. However the frame construction could have used some work as one leg kept wiggling off. Easy fix. Eventually…

Even though the top needed painting, I plunked the table in front of the sofa and happily used it as-is, taking note it really did need a makeover…
Until one of the legs fell off. Oops. Glad my dinner wasn’t on it at the time!
No problem! While the blue paint was fun to live with while it lasted, it didn’t marry my living room well anyway. So it was time for a fresh makeover to help this table not only blend better with my own home, but to add a little funky junk style to it so I’d love it even more. And fix what was broke to create a hopefully more sturdy, longer-lasting furniture piece!
Not only did the final makeover make alllll the difference in how the pedestal table functions, oh my goodness, it’s DARLING in it’s made-over state! And so easy to do!
Have a little table that’s seen better days? Here’s the instructions of all the finish steps required that made this cutie sing!
Antiques pedestal side table makeover
Supplies I used:
Fusion Mineral Paint in Coal Black (get 10% off)
Stain and Finishing Oil in Natural by Fusion Mineral Paint (get 10% off)
or use funkyjunkinteriorsfmp for 10% off at checkout
Furniture stripping gel and wash

1. Strengthen and fix any broken or weak components.
Because the leg fell off, I needed to dig into the metrics of how this was built so I could see if it could be salvaged.
I always start with, ‘how was it built?’ If there’s screws, that’s easy! Just unscrew it and figure it out from there.
Turns out all I really needed to do was tighten a screw so the leg wouldn’t wiggle in the slot. Perfect. I ended up removing all the legs to tighten everything up so I wouldn’t dump my dinner nor invaluable coffee. Done!

Strip table areas down to bare wood
2. Strip off paint.
While I would have loved this entire pedestal side table to be down to bare wood, I wasn’t prepared to remove the paint out of the finer details! So I split the difference. I stripped the top and painted the base for a gorgeous 2-toned effect.
How I stripped the paint:
- outdoors, apply a stripping solution to the top and allow the product to sit
- use a carbide paint scraper to remove the paint
- repeat as many times as required
- once bare and dry, sand the top right down to bare wood using an orbital sander
I refinished the top using Stripwell, which consists of a non-toxic stripper and cleaner.

Prepping the table base for paint
3. Clean the piece where you plan to repaint.
My own furniture cleaning procedures are always the same. I grab Fusion’s TSP Alternative to do the job! This is a safe, non-toxic product that is concentrated, and doesn’t require wearing gloves nor do I need to rinse it off!
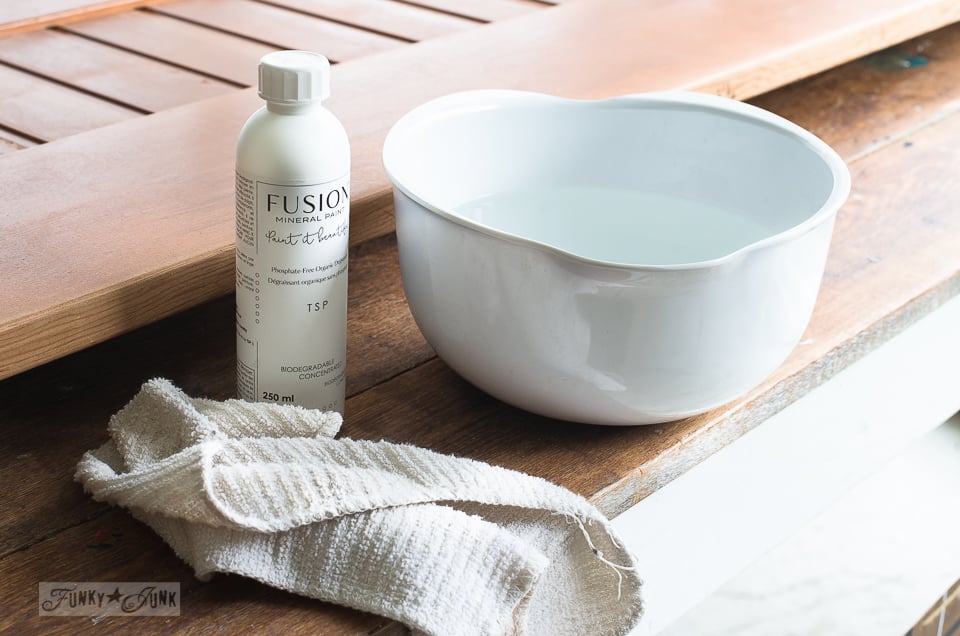
How I clean with Fusion’s TSP Alternative:
- pour a capful of TSP Alternative into a bucket of warm water
- using a clean rag, wipe the entire piece down and allow to dry
4. Scuff-sand the areas you wish to repaint with a sanding sponge.
Scuff sanding adds ‘tooth’ to the surface so paint adheres more effectively. I sanded used a sanding sponge just until the painted surfaces appeared scratched.

Staalmeester paint brush from the One Series called #25
Re-paint using a quality paint and brush
5. Paint the base in Fusion’s Coal Black using a high quality smaller brush meant for detail.
Since there were so any curvy bits to this pedestal, I chose a Staalmeester paint brush from the One Series called #25. It held lots of paint while getting into all the details perfectly!

This is a great brush to have in your paint arsenal for when you paint smaller things. It left a lovely, smooth finish wherever I used it.
How to get flawless coverage with Fusion Mineral Paint:
- apply the paint with a quality brush until smooth coverage is met
- allow to dry before adding a 2nd coat
- since Fusion dries so quickly, resist the urge to double-brush as that can lead to brush strokes
I’ll also be sticking on some new felt pads to the bottom of the legs.

I also used this same brush to paint the edge trim of the pedestal table top.
Loading the brush with enough paint, then painting slowly was the key to getting great results, with no painters tape required!
Isn’t that black trim against the wood grain magnificent though?!

Stencil an Antiques design on the top of the table
6. Stencil Antiques Buy and Sell stencil to the middle of the table top. Once dry, sand lightly.
I considered leaving the table plain, however for me, it just needed ‘something’. While this pedestal side table isn’t an official antique, I felt it had the overall vibe of one, so an Antiques sign did the trick!
The size was perfect for this table. Plus, the decorative flourishes seemed to marry the style of this table to a t!

The stenciled results were perfect.
How to stencil with no paint bleed:
- dip a dome-tip stencil brush into paint
- remove most of the paint onto a rag until the brush tip ‘feels’ dry’.
- do a test elsewhere to ensure the brush leaves ‘barely any paint’
- tap paint through the stencil, first going over the entire word, then doubling up the coverage once the brush is drier
Visit many more tips on how to stencil at: Everything about stenciling HERE


What a cutie, huh? That black Antiques lettering really pops against that decadent wood grain.
Once dried, I then took a sanding sponge to the words to knock them down smooth.

Fusion Mineral Paint Stain and Finishing Oil in Natural
Stain the piece to further protect
7. Protect the wood top from moisture as well as all painted areas for added durability with Fusion Mineral Paint Stain and Finishing Oil in Natural.
Stain and Finishing Oil or SFO, is a floor-quality wipe-on, wipe-off product that is SO easy to use.
While you will want some ventilation, this is the only stain I like to use indoors because it smells so much less than most other stains on the market. I am indeed a fan of furniture products you can use indoors!
Plus, the easy wipe-on wipe-off application method makes it a snap to use for both small and large surfaces that will offer years of superior performance like my argyle TV tray got! And if it gets marked up, just add another coat!

How to use Fusion’s Stain and Finishing Oil
- brush on or wipe on product with a cloth
- allow to sit for a few moments or minutes, depending how much coverage you wish for
- wipe the excess off with a clean rag
- apply another coat if you desire more coverage and a slightly higher sheen. I added three coats to the wood grain top and one coat to the painted areas.
I chose to use the SFO on all the painted areas too. SFO on any painted surface helps to increase durability and smoothness to make cleaning easier while leaving a slight satin finish.
Note: this product will add more depth and color richness to woodgrain tones, so do a test to ensure you are happy with the end results.
If you want fabulous water resistant protection without changing the wood tone, I highly recommend American Finishes Top Coat High Performance Dead Flat. You can see the results of this product on an antique sideboard makeover I did HERE.

The finished Antiques pedestal side table makeover!
And my friends, the end result is a gorgeous pedestal side table that looks elegant, is durable, and marries my room decor perfectly!
Isn’t it a beauty? I think it has this certain hand-craftsmanship vibe to it thanks to the scalloped edges, elegant carved legs and entire shape and weight of the piece.
I also love how the SFO added a satin sheen to the black pedestal base, which helps to highlight all those gorgeous curved areas!

And the wood grain meshes well with my wood floors and kitchen, making this little pedestal side table team up with my home perfectly!
I use this table in place of a tv tray in front of the sofa! The size is perfect for a plate and a good cup of coffee.
Speaking of TV trays, I love to makeover those too! See many at: Unique TV tray makeovers HERE

I’m always amazed what a little bit of paint and elbow grease can accomplish! I think it’s a stunning piece that I’m proud to use while watching my favorite shows.
Wonder what’s playing tonight…
Would you have brought this piece home too? How would you have refinished it to suit your home?
Other furniture revamps to check out:
Check out other unique side table makeovers HERE
Visit many more unique furniture makeovers HERE
Antiques pedestal side table makeover
Supplies:
Instructions:
- Fix any areas that need work, such as loose joins, etc.
- Strip the paint on top of the table using a furniture stripper and carbide paint scraper.
- Sand the top down to the bare wood with an orbital sander.
- Clean the painted areas with TSP Alternative.
- Paint all desired areas in Fusion's Coal Black. Apply 2 coats if needed.
- Stencil an Antiques sign on the top of the table. Lightly sand once dry.
- Protect the entire piece with Stain and Finishing Oil by wiping product on, then wipe off excess. Allow 24 hours to dry. Add more coats for increased durability and sheen.
What an adorable table. I love that pieces like this are being kept out of landfills. I myself love to “curb surf” for little gems 🙂 Great job Donna!
I absolutely love your makeover! Leaving the tabletop in it’s natural color and adding the stencil is pure genius. Thanks for sharing and saving this beauty from the landfill!
Wow, what a transformation!!! I never thought I’d say this but sometimes losing a leg comes with benefits 😉 And how on earth did you manage the edges without painters tape? If I tried that it would look like a drunk snail wobbled around the table.
P.S. Hope your toothache has been sorted out. Ouch, not fun.