Get into the holiday spirit with this easy, high-end chevron Christmas tree sign made from stencils and wood strips! An elegant wood Christmas tree that’s so easy to make! The size is perfect for a Christmas front porch, or use to hang on a wall if desired.
![]()
Ohhh you may have already seen a couple of my wood Christmas tree porch signs around… because I appear to make a new one each Christmas season!
My favorite Christmas trees:
Painted Christmas tree with crate
Christmas tree seedling with real branches
So it should come as no surprise that this Christmas would be any different! I love creating wood Christmas trees that look complicated to make, however my own true challenge is creating an easy way for anyone to make one without endless measuring or pro building skills!
So what could I possibly make this year that’s different? And could I style it different from the rest so it stands out in a unique way?
You bet I can! However first, I needed to create a stencil to help make this task effortless…
![]()
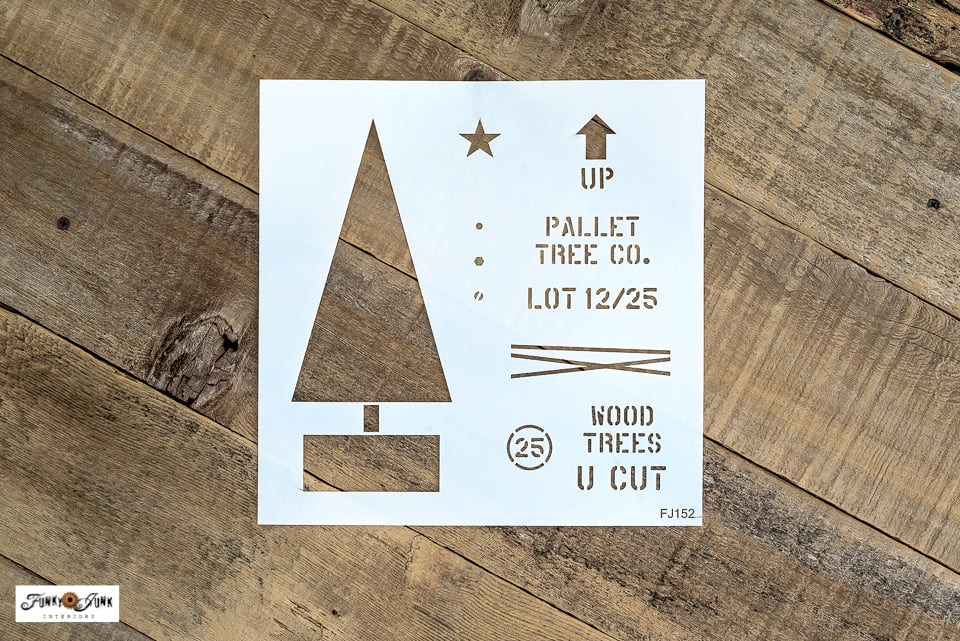
View Chevron Christmas tree stencil
Chevron Christmas Tree stencil
The newest Chevron Christmas tree stencil is specifically designed so you can either stencil the entire design or use real wood strips for the body of the tree!
But here’s the kicker… This Christmas tree stencil comes with a pack filled with half the tree board pieces, so you can simply lay them on wood, measure, then cut 2 of each. No need to measure a thing! It’s seriously that easy.
There’s more surprises in store on this one as well! So if you too would love to have a classic looking tree with a twist of unique, here are the full details…
Supplies you will need:
Chevron Christmas tree stencil
Wood Christmas Tree in Crate stencil
Wood planks larger than the stencil – I used 3 reclaimed wood boards 5.25″w x 49″ long.
1.5 or slightly smaller cedar strips
Random wood scraps cut into triangles
Fusion Mineral Paint in Coal Black (get 10% off HERE)
Cordless drill for screws and small drill bit for making a hole
Lightweight twine and cotton string
Items to decorate the tree
![]()
Measuring and cutting the backer boards
1. Cut a board background that is longer than the tree stencil.
The image of the Chevron Christmas tree measures: 9.8″w x 33.25″ tall.
- background boards measure in total: 16″ x 49″
- each board measures 5.25″ x 49″
2. Using 1.5″ cedar strips, cut 2 pieces the width of your background.
- each support board measures 1.5″ x 15.75″
![]()
How to cut the tree body wood pieces
3. On additional cedar strips, place the mylar stencil boards on top of the board, and pencil in the shapes of each one twice.
- save on a ton of additional cuts by rotating the mylar to meet up with the same cutting lines
- ensure your actual cuts are on the outside of each pencil line so you don’t cut too short
4. Cut the shapes using a miter saw. (read my own miter saw review HERE)
The most important part is to ensure your board angles are all the same. I used masking tape to mark the angle on my miter saw on both the right and left sides, so it was simple to realign with each board cut.
After cutting, stack the duplicates on top of each other to ensure they are cut the same.
![]()
Painting the backer boards
5. Paint the background in Fusion Mineral Paint in Coal Black (get 10% off HERE).
Since I am using real wood strips for this tree sign, I desired a black backdrop to really make those wood strips pop! I also think a white background would make a pretty color change as well!
![]()
Attaching the support wood strips
6. Lay the two support wood strips across the boards, then pencil-in two screw holes on each board.
7. Place the wood strips on top of a scrap wood board, then use a small drill bit to create pilot holes in the wood strips so they don’t split when you insert screws.
![]()
8. Place short black screws into each pilot hole, then screw them in using short bursts with the cordless drill. Just don’t overscrew, or the wood may split.
Repeat the process to both the top and bottom support boards so your signboard stays intact.
![]()
Positioning the Chevron Christmas tree stencil onto the boards
9. Position the stencil in the center of your wood planks, then use masking take to secure the stencil into place.
I like to run masking tape along the entire length of the top, so it acts as a door hinge, allowing me to lift the stencil to check my progress as I work.
![]()
Retro Star Sky stencil HERE / View other sky stencils HERE
Adding stars to the sky
10. Some of the following project photos showcase stars in the sky. I later changed direction and painted over them because I added more detail onto the tree this round instead. So if you’d like to add a sky to your own tree sign, it’s easy! Here’s how:
- Run some masking tape across the width of the middle of the stencil, instead of along the top.
- Flip the top half down.
- Position a sky stencil of choice in the upper left corner. I’m showcasing Retro Star Pattern.
- Bring up the tree stencil again, then memorize which stars to stencil that circle around the tree, not through it.
- Stencil the stars in Casement (white), then keep checking for placement by positioning the tree stencil again for easy reference.
- Do both sides, then move the stars a little lower to continue, keeping the stars heaviest on top, then fade out to less as you move downwards.
How to stencil with no paint bleed:
- Dip a dome-tipped stencil brush into paint.
- Remove most paint onto a rag until brush feels dry.
- Tap or swirl paint through stencil for desired effect.
Learn many more tips on how to stencil in THIS POST: Everything you’ve ever wanted to know about stenciling
![]()
Stenciling the star, trunk and tree stand
11. Stencil in the star, tree trunk and tree stand as desired.
Star and stand:
I wanted my star and stand to look like warm tones of metal patinas, so I used a combination of Fusion Mineral Paint in Iron Clay, then added a mottled look on top with Chocolate.
Tree trunk:
The tree trunk was stenciled in a blend of Chocolate mixed with white to create a light tan, with the darkest tone on the bottom, fading lighter as you work up.
![]()
![]()
Stenciling the middle of the tree for board placement
12. Using a light grey paint, ‘dry-brush’ along the middle of the tree stencil and a tiny bit along the length of each plank to leave a barely-there light impression for the wood strip placement.
After lifting the stencil, it should resemble like you chalked-in the placement. This will serve as a guide to position the cut wood strips.
![]()
How to create wood scrap Christmas presents under the tree
I created some scrap wood presents at the base of the tree before I glued anything down, so I could glue everything all at once.
13. To create wood scrap Christmas presents, cut a few wood strips horizontally, vertically, square, and even include some other smaller different kinds of wood pieces for a variety if desired.
Some of my cedar strip wood was already white.
14. Stack the presents around the base of the tree until you like the look.
![]()
15. Using light twine and string, wrap it around the wood pieces in different ways to resemble ribbon, then insert faux evergreen branches and faux berries or whatever you wish!
I think baker’s twine in Christmas colours would also look adorable!
16. Hot glue the presents into position.
![]()
Gluing on the wood pieces to the body of the tree
17. Dry-fit all the wood pieces over top of your stenciled impressions.
To make placement really easy, I stacked the duplicates wood strips together, then lined up all the wood strip stacks from shortest to longest.
![]()
18. Using a hot glue gun, add glue to the underside of a left and right piece at the same time, then carefully position them in the middle of the tree with the middle touching.
You can also leave gaps in between the wood strips, however I really liked this look!
I straddled the sign so I could view the exact middle of the tree while placing the wood strips.
If you find the pieces going off-center, quickly lift them with a flat tipped screwdriver, remove the glue, and place again. It’s imperative to center them so the bottom of the Chevron Christmas tree lands perfectly with the tree stand.
![]()
Stenciling hinges on the tree
19. Position the 3 hinges located along the top left of the stencil to the middle of your wood pieces, then stencil.
These hinges are a funky addition to add to your tree if desired! I commonly add rusty junk hinges to many of my projects for added detail, so this is a fun twist to that look.
I positioned the hinges on the 4th, 7th, and 10th wood strips.
- Position the hinges where desired, then stencil in Coal Black using a small stencil brush.
- To create nail holes, reposition the stencil by using the registration marks (a part of the hinge), then stencil in a light grey.
![]()
Decorating the chevron Christmas tree
20. Now it’s time to decorate the tree!
Simply position a variety of things on your tree, until you like what you see, then hot glue each piece to the tree.
Decorations I used:
I desired a neutral look of green, wood, black and white, then coordinated my items to suit.
- vintage keys
- a green faucet handle
- a rusty washer with a sprig of faux evergreen branch to create a wreath
- real star anise
Decorating the presents:
I added a few retro star bursts in white around the presents with Retro Star Sky.
Then added the circled 25 from Christmas Tree in Crate.
To add fairy lights:
I used a small string of fairy lights with a battery pack.
Drill a small hole near the bottom of the tree where you’d like the fairy lights to start, thread them through from the back, then arrange as desired along the tree front.
I held the lights in place with short black screws that double as decorations.
![]()
Stencil used: Wood Christmas Tree in Crate stencil HERE
To create a tree farm sign:
Cut two wood strips the same size, then drill holes on the left and right top. Thread through some twine for hanging. Hot glue them together.
Using the Wood Christmas Tree in Crate stencil, I stenciled in the words Wood Trees / U Cut in black.
I also used this stencil to decorate the presents, and you can also use it to stencil the wood on the tree if desired! See below…

Stenciling on the wood pieces
Here’s another way to decorate your tree! You could also stencil in the wood planks on the tree with cheeky Christmas phrases like I did with HERRINGBONE CHRISTMAS TREE (image above)
Get the exact same images and sizes with the more compact Wood Christmas Tree in Crate stencil HERE
![]()
The finished Chevron Christmas Tree sign!
And that is how I brought my Chevron Christmas tree to life!
This wood Christmas tree is ALL ABOUT 3D additions using scrap wood!
I also think this tree would look adorable with a sky filled with stars if you leave the tree a little more plain. The fun part is YOU get to choose how to trim out your Chevron Christmas tree!
![]()
Close-up of the tree decorations
Oh, I then also added a JOY sign with 3 scrabble letters. Aren’t the details fun?! And the lights add just the right amount of glow for interest!
If you use the tree outside, ensure the lights are well protected or search for some outdoor fairy lights if possible.
So here’s the Chevron Christmas tree, staged a few different ways…
![]()
![]()
Tree sign staged indoors
I think the Chevron tree looks adorable alongside other DIY wood Christmas trees to chime in with the sign!
![]()
Tree sign staged on the front porch
And here’s the sign by my front door outside! It’s honestly the perfect size, not too big and just big enough to be interesting!
![]()
The added presents create such a fun and unique way to further decorate the tree sign, don’t they?
And while the sign looks adorable both indoors and out, I think my tree sign will become the perfect addition to enjoy in my own bedroom since I like to watch my shows in the evenings. It’s a great way to have a Christmas tree in the bedroom without taking up major space!
![]()
I’m going to have a ton of fun appreciating my funky junk styled Chevron Christmas tree this Christmas! How would you style it?
View the Chevron Christmas Tree stencil HERE
Video tutorial: Wood Chevron Christmas Tree
.
Visit above to watch the build of the Chevron Christmas tree!
DIY wood chevron Christmas tree with stencils and wood strips
Supplies:
- Chevron Christmas tree stencil
- Wood Christmas Tree in Crate stencil
- Retro Star Sky stencil
- Wood planks to create backdrop - 16" x 49"
- 2 wood strips for support - 1.5" x 16"
- Random scrap wood for presents
- Fusion Mineral Paint in Coal Black
- Dome tip stencil brush
- Wider paint brush like this Palm Pro
- Glue gun
- String or twine
- Fairy lights
Instructions:
Preparing the sign boards
- Cut sign boards longer and wider than the stencil image.
- Paint the cut boards black.
- Support the boards by screwing in two 1.5 wood strips along the top and bottom.
Wood strips
- Place each mini stencil strip onto a 1.5 cedar strip, then trace each one twice.
- Cut the wood strips with a miter saw, ensuring the angled cuts are all the same degree.
Stenciling
- Center the Chevron Christmas Tree stencil in the center of the boards.
- Stencil the tree star and tree stand as desired.
- Gently swipe the stencil brush along the spine of the tree to create a light impression for the future cedar strip placements.
Hot gluing
- Hot glue each wood strip to the tree.
- If you made wood block presents, decorate, then hot glue into place.
- Glue on any kinds of decor you wish.
Fairy Lights
- Drill a small hole at the bottom of the tree where you wish for the lights to start.
- Feed the light string through the back, then place along the tree where desired. I held mine to the tree with screws acting as ornaments.
Notes
![]()
More unique wood Christmas projects to make:
10+ Christmas porch signs (all my favorites are in this post!)
17+ DIY Wood Christmas Trees – my entire collection is showcased in this post!
Visit all my Christmas decor from one page HERE
View all Christmas stencils HERE
Donna, I really enjoyed watching this project come to life on IG!! I think you’ve motivated me to finally get back into wood crafting. 😊 It’s been years and years. Thank you!!!
P.S. Getting to the Comment section on blogs is very very difficult now especially on phones. Lol! The other kind of junk takes over everything.
Thanks Terri, glad you caught it on IG! And I completely understand about the comments! Part of the issue is my blog theme which I plan to change in the new year. Current tip: tap the Jump To Printable Tutorial, which will zoom you right to the bottom of the post. I use it frequently myself!