Love the look of rustic wooden crates? Get the look instantly with this cool DIY wooden crates dresser makeover for paint storage… or anything else desired! Quick and easy dresser revamp with paint, reclaimed wood and pallet or crate stencils!

If there’s one thing for certain in my paint studio, it’s that things can and will change quickly, dependent on paint supply storage needs!

Adjustable shelves in a paint studio
Welcome to my paint studio! It’s a space on the bottom floor with white painted concrete floors, and plenty of windows for a photo studio too.
However, I needed a home for the many bags of wonderful Homestead House Milk Paint, so it was time to bring in some new paint storage!
I love the challenge of creating free shelving from reclaimed wood! Here’s a few that would work for paint and more…
Other unique paint shelf ideas:
Simple block and plank shelving for easy paint storage
Adjustable reclaimed wood paint shelves
Pallet-style shallow workshop shelving
Check out 34+ other unique shelving ideas made from reclaimed wood HERE
However, with the addition of milk paint, I ran out of room. Milk paint comes in bags that can tip over a little more easily than jars, so I desired a storage plan that held them in place moreso.
You can read my own review on All About Milk Paint HERE
I thought of hanging the bags up. But then another idea came to mind since I already had it on hand…
A tall and skinny dresser became a bright new storage solution to solve this problem… sort of by accident!

The dresser before
I had picked up this tall, skinny dresser off the curb awhile back. And while I questioned its durability and decor look, I decided to transform the dresser prior with some stenciled vintage vent holes HERE which I really loved!
However I still didn’t have a good use for the dresser itself. So I shoved it into a corner.
Then one day while eyeing up the bags of milk paint in boxes, I decided to give the tall, skinny dresser one more chance. I placed the milk paint bags inside the drawers, with every other drawer removed so the bags had plenty of headspace.
Well I’ll be… it actually worked! So once I decided the idea was sound, it was time to give this little dresser an ultimate rustic makeover that was more my own decor esthetic.
I love a good furniture makeover… one of my favs is when I flipped this dresser into a coffee table. Done and done!
Here’s a few other furniture makeovers you’ll enjoy….
More unique furniture makeovers:
Rustic side table pallet-style that stores fire logs
DIY IKEA hack pallet side table with added shelves
Grain Sack Striped vintage chair makeover
View many more unique furniture makeovers HERE
Anyway, visioning the drawers as wooden pallets lumber or wood crates like I did to THIS SIDE TABLE, the dresser was flipped into a DIY wooden crates dresser makeover for paint storage!
This wood pallet or wooden boxes dresser makeover takes very little time, and the look is so SO much cooler with a rustic pallet or vintage crates vibe!
And of course, depending on you own preferences, this easy rustic dresser makeover can be implemented on nearly any dresser, and can be used to store anything desired!
So whether you need a dresser but can’t land one you like, or have one sitting around you don’t particularly love the look of, perhaps this wooden crates dresser design may work for one of your latest finds too!
Trust me… you won’t recognize the before.
Here’s how I did it:
DIY wooden crates dresser makeover for paint storage
Supplies I used:
National Brewers Coffee stencil
Reclaimed wood
Fusion Mineral Paint in Ash (get it 10% off HERE)
12 cm Staalmeester velour paint roller

Preparing the dresser
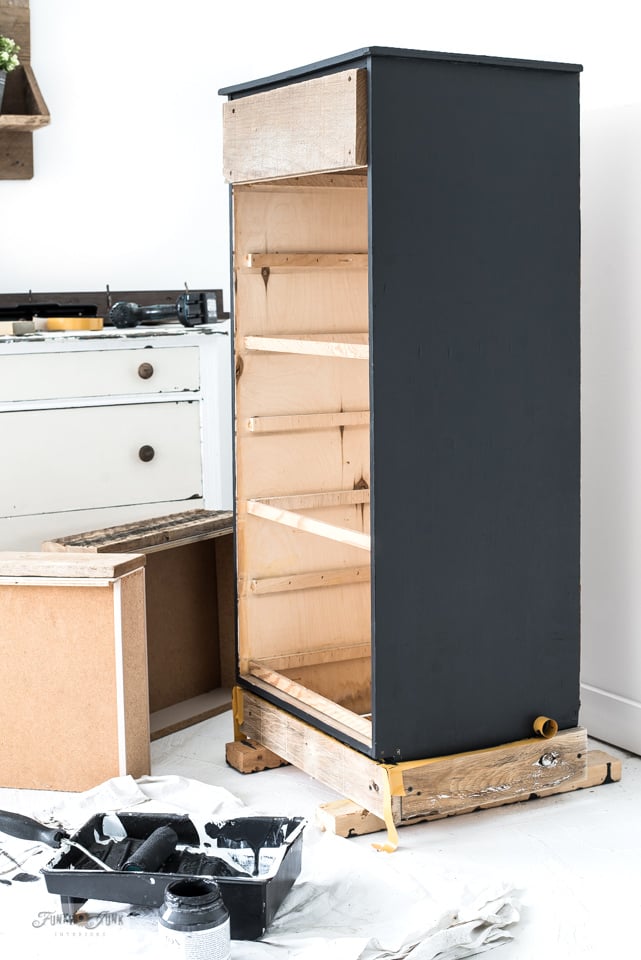
1. All the dresser drawers and the wood strappings above each drawer were removed.
Removing the extra framework allows the taller milk paint bags to stay upright without being pushed over when opening a drawer.
But I would advise to leave the strappings intact under each drawer so the drawers close at the appropriate depth.

Adding wooden crate drawer fronts
2. Cut reclaimed wood to fit the drawer fronts.
In this case, the wood can be taller (but not longer) than the drawer fronts, since I was removing every other drawer. However if you are covering every drawer, you’ll need to keep the top of the crate wood the same as the actual drawer front.
Lightly sand the wood on all sizes and edges with an orbital sander.
How to prepare reclaimed wood prior to building
All my reclaimed wood is cleaned prior to building. HERE is how I clean and store reclaimed wood for future use.

3. Attach the wood fronts to the drawers with screws.
Place the reclaimed wood good-side-down. Position the drawer on top of the plank, then attach with screws from inside the drawer.

Here’s all the spacious drawers slipped inside offering plenty of space. Doesn’t it look great?!
4. Beef up the bottom and top of the dresser with reclaimed wood for trim.
Since there was some damage along the bottom of the dresser, some reclaimed wood was cut to fit, then screwed onto the dresser.
This was later balanced out by adding a reclaimed wood top as well, which is shown in the reveal pictures. Planks were cut to size, sanded, then attached to the top with screws.
I like the addition, it really adds extra visual weight to the bottom which I think the less durable dresser needed!
Thick plywood could do the trick as well as long as the edges were sealed up before painting.
Painting the dresser sides and top
5. Paint the sides, front edge and top of the dresser.
a) Areas that weren’t getting painted were taped off. A paint brush was used to cut in close to any trimwork where a roller can’t reach, using Fusion Mineral Paint’s Ash.
b) Then the sides, top and front edges of the dresser was rolled with a Staalmeester velour roller, leaving a super smooth finish!
The coverage was so good, only one coat was required!
All about Fusion Mineral Paint
Fusion Mineral Paint is a high quality DIY paint created for furniture and many other surfaces. It has a built-in top coat and self primes. After curing, it creates a super durable finish that is hard to beat!
Learn more about Fusion Mineral Paint in my review post HERE

Ash is sort of like a very deep grey or softer black. It’s a really nice tone if you want a deep moody look without the intense dark contrast Fusion’s Coal Black paint colour offers.

* Get 10% off ALL Fusion paint and supplies HERE
*(discount does not include Staalmeester brushes)

Painting wooden crate and pallet details with stencils
6. Insert each drawer back into the dresser for easier styling.
7. Pallet or crate stencils were chosen for each drawer front to create crate and pallet images.
Where to find pallet or crate stencils:
8. Each image was stenciled in Fusion Mineral Paint’s Ash to replicate authentic pallet and antique crate markings.


How to stencil pallet or crate images
- Position stencils were desired.
- Use masking tape to hold stencil in place if desired.
- Load a dome-tipped stencil brush with Fusion’s Ash, then off-load most paint onto a rag or paper towel until the brush tip feels dry.
- Tap or swirl the stencil brush through the stencil to achieve the desired effect.
- Age the lettering by either stenciling with a lighter touch, or running a sanding sponge across the the stenciled area once dry if desired.
- To further enhance any lettering, rub a small amount of Fusion’s Furniture Wax across just the lettering.

Random positioning was used for the Pallet Stamps stencil. This is one of my most used and personal favorite stencil designs!
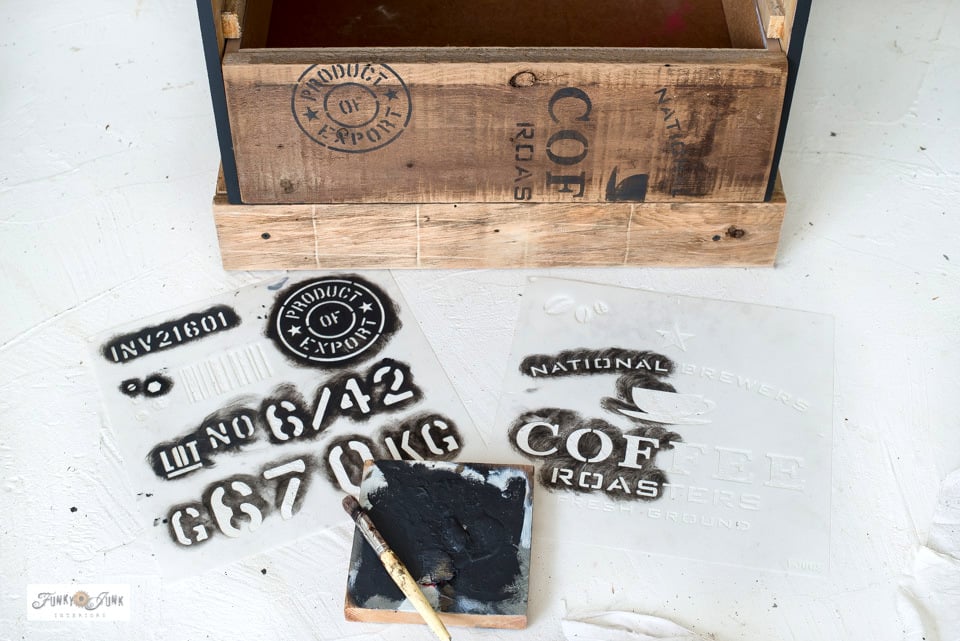
National Brewers Coffee stencil HERE
The above photo shows how the Pallet Stamps stencil and National Brewers Coffee stencil share the same crate drawer front.

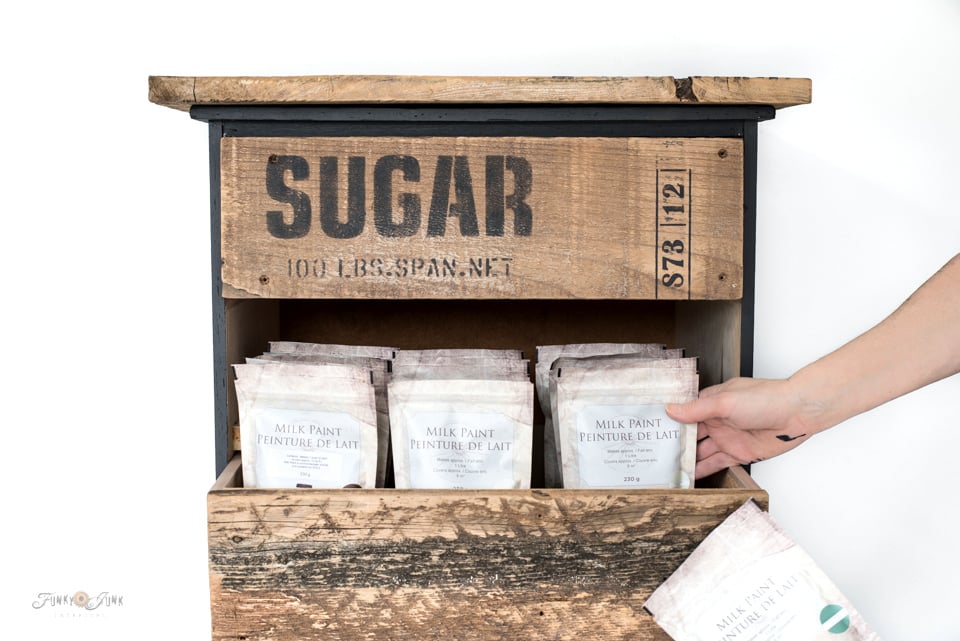
The completed wooden crate dresser makeover!
Then all that was left to do is load up the drawers, and the DIY wooden crates dresser makeover for paint storage is ready to organize all that paint while looking super rustically cool!
And while this dresser was the right size for my paint storage, this kind of dresser could certainly store many other things as well you may not think of…
Other dresser storage ideas:
- office supplies
- paperwork storage
- workshop tools
- small stencil storage
- clothing
- gloves in an entry
- toy storage
- games room
- file folder storage (with the right enhancements)
- office furniture
- rustic style dresser
- great look for nightstands
- pantry or kitchen storage with a microwave or coffee station on top
- TV or entertainment uses

The first drawer was left intact for extra storage space which really comes in handy!
And since the 2nd drawer already had some really cool wood texture working for it, it was left un-stenciled. Just let that rustic wood shine!
Need some paint? Simply pull out a drawer, and grab your milk paint or paint of choice!
So from the plain dresser before…

To a much cooler dresser now! You can barely tell it’s the same piece! Isn’t it neat?
I love how each crate or pallet styled drawer is different, yet they all marry each other perfectly.
And the top and bottom wood trim sure added a nice touch of warmth against the Ash painted sides!

Since the drawers are easy to pull out from the bottom, drawer pulls weren’t required, but of course could easily be added if that’s preferred.
You may even think it’s great quality furniture at this point! I had nothing to lose by trying.
But the best part of all? I can easily find all my milk paint again!
Which means it’s time for a new project…
.
Video – wooden crate dresser
Watch a short video on how the wooden crate dresser was built!
DIY wooden crates dresser makeover for paint storage
Supplies:
Instructions:
Making the drawers
- If you desire more headroom, remove every other drawer.
- Match a reclaimed wood plank to the drawer front, then cut-to-size.

- Lay the plank good-side-down, place drawer front onto board, then attach with screws from the inside of the drawer.

- Stencil the drawers with crate stencils in random ways to mimic wooden crates and pallet board stamps.Pallet Stamps stencil, Pure Cane Sugar stencil, National Brewers Coffee stencil, Fusion Mineral Paint - Ash, Dome tip stencil brush
- Lightly distress lettering with a sanding sponge if desired.
Painting the dresser
- Add any beefed up trim work desired.
- Paint the dresser sides, and front trim in Ash.Fusion Mineral Paint - Ash, Wider paint brush like this Palm Pro, 12 cm Staalmeester Velour Paint Roller

- Insert the drawers, then load them up!
Notes
More unique projects and helpful supplies:
View other unique shelving storage solutions HERE
Get more crate or pallet stencils from HERE
Find any Fusion Mineral Paint or Homestead House Milk Paint products for 10% off HERE
Learn all about Milk Paint HERE
Wow! You completely transformed that piece & it looks great. If I hadn’t seen the step by step I wouldn’t have known it was the same piece.
Thank-you! I’m pretty stoked how it turned out! Seems like the wood I added even strengthened it some. Bonus! haha
Wow! I cannot even see the original piece once you were finished with it! Amazing!
Crazy what a little reclaimed wood can do, huh? And thank-you! It’s cool AND useful now!
I adore this piece!!! I miss making and remaking furniture, but hope to be able to it again in the future… Well done. I live vicariously through you!
Thank-you! A new project was so overdue. It felt good to be creating again so I know that feeling well! I think it’s time to gut my house so I have a reason to go full tilt again. LOL
Yes, I love remaking my home… I love to make furniture and then move it on every time I make something new. A change is as good as a holiday! 🙂
Love the look! It’s the perfect home for you milk paint!
Isn’t it fun?! The fit is perfection! And thanks!
So inventive….perfect storage for your paint. Looks like it should be in an old time store. Love it!!!
That’s an amazing transformation, Donna. I love it so much! I also really like the printable tutorial at the end of your post.
That’s amazing! Like a whole new dresser!
WOW!!!! Creative out of the box thinking at its absolute best. I love how the crated dresser turned out, Donna.
This is such an amazing makeover Donna! I love the rustic vibe you gave this dresser and how sturdy it now looks! I’ve been looking for ideas for a small ugly bookcase I found curbside and may try something similar!