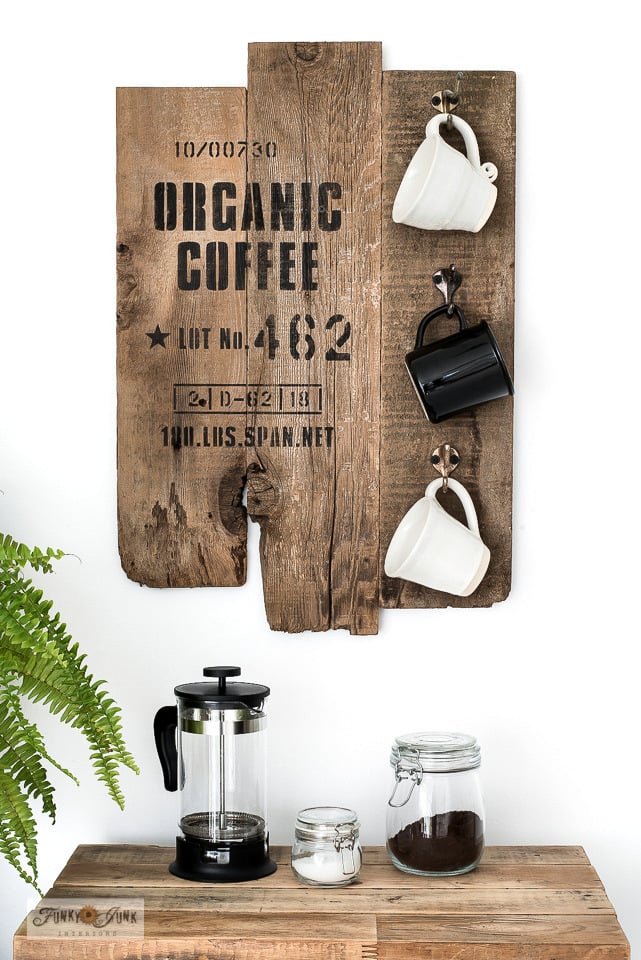
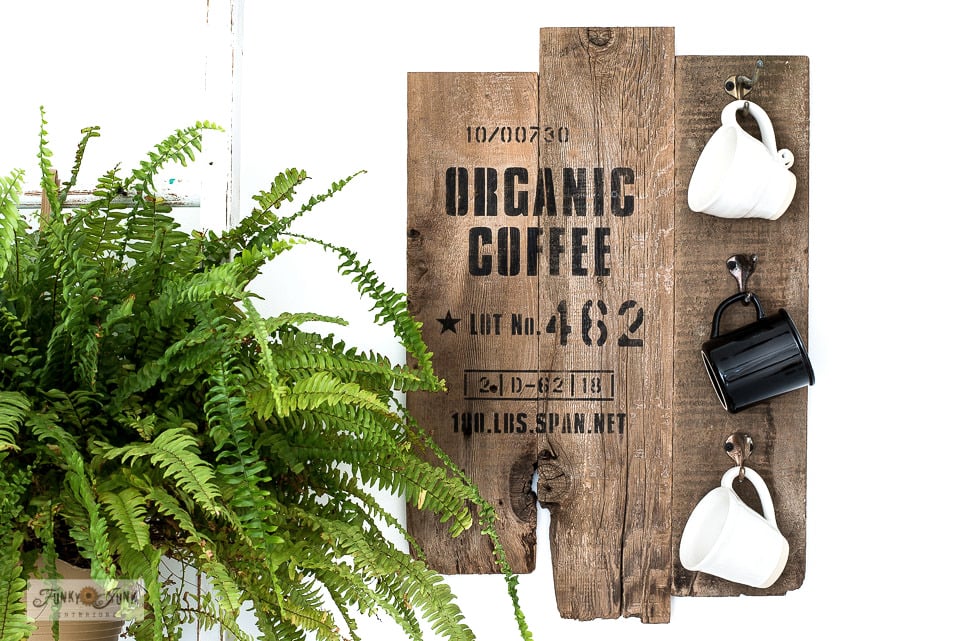
This easy-to-create handmade coffee sign complete with hooks for mugs is perfect for any coffee addict’s wall! Here’s how to get the look using 3 simple planks.
This post contains some Amazon affiliate links in which I earn a small percentage from qualifying purchases through these links, at no extra cost to you. Thank-you for helping to support my blog!
About a month ago, my junkin’ buddy Kim from Junky Encores who whips up the most creative junk-infused projects EVER, reached out to me, asking if I’d consider designing a coffee sack stencil.
Why didn’t I think of that?!
I’ve always loved the stamped look on burlap!
You know the look right? HERE’S how I made window shades from some real coffee sacks.
This idea had loads of great potential. Not only could a cool coffee sign look on burlap be achieved with it, imagine the perfectly-themed coffee signs one could make on reclaimed wood, pillow stamping and more. The ultimate coffee-themed home decor.
Time to get to work! So over the past little while a new coffee sack stencil was born…

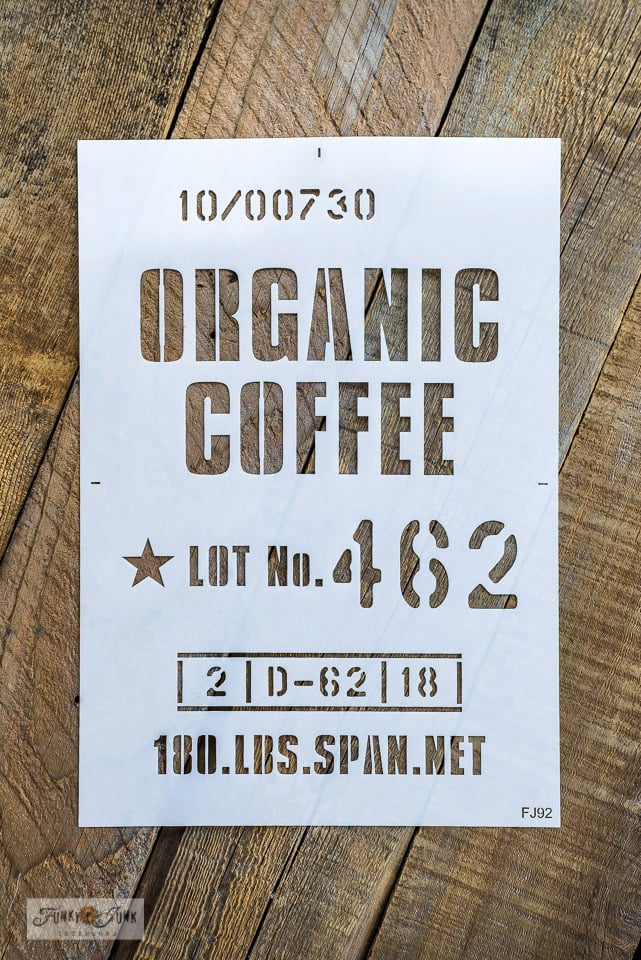
View the Organic Coffee stencil HERE
About the Organic Coffee stencil
.
The Organic Coffee stencil is styled like a burlap coffee sack design. With lotsa industrial charm! Weights, numbers, and a bold Organic Coffee title makes this stencil easy to industrialize other stencils as well as use separately for smaller project details! FUN.
So let’s make a super simple coffee sign idea that anyone can make in just a few minutes, complete with hooks to hang up your mugs! Call this a complete and compact coffee station all-in-one. Here’s how!
Easy DIY Organic coffee sign with mug hooks

Supplies I used:
.
Fusion Mineral Paint’s Coal Black
dome-tipped stencil brush (my fav kind!)
3 reclaimed wood cedar fence planks at various sizes
cordless drill and drywall screws

Preparing the wood
.
1. Cut 3 random reclaimed wood cedar fence planks to desired lengths, leaving the bottoms with live edges. (meaning, not trimmed)
This round, the more random and rugged the better!
These boards measure: 6″w x 22″h / 26″.5″h / 24″h
Overall size of sign measures: 18″w x 26.5″h

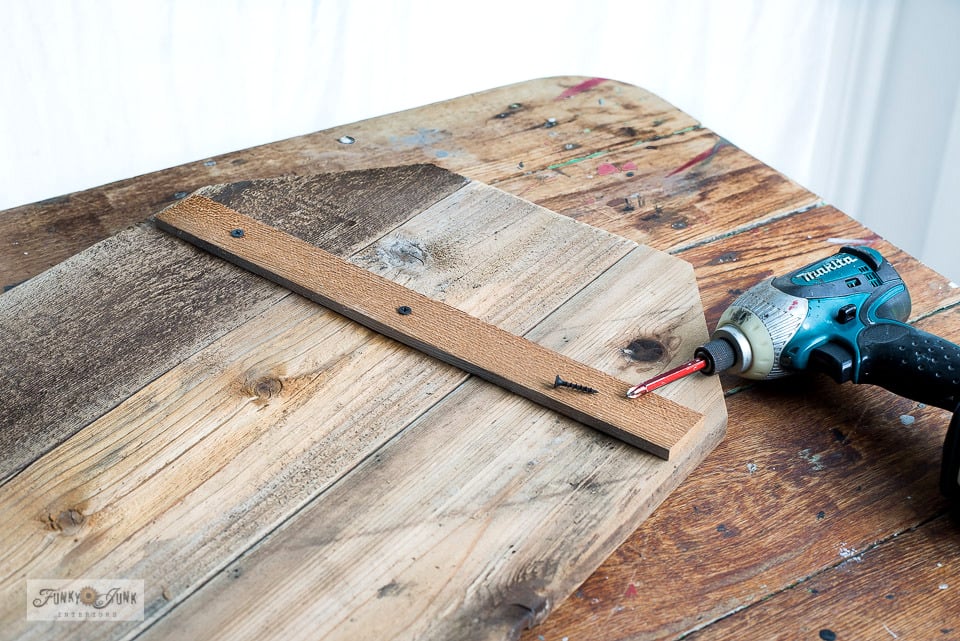
Assembling the planks
2. Position the 3 planks of wood side-by-side, and attach them to each other with wood support strips running horizontally or with a Kreg Jig.
I used my Kreg Jig to join the planks, which took minutes to do! 6 drilled holes later and I was done.
Video tutorial: How to use a Kreg Jig
.
A Kreg Jig is a tool that helps you create pocket holes so wood can join end to end effortlessly! It creates very strong holds, and is very easy to use, however there’s a few tricks to using it…
.
Click short video above to learn how to use a Kreg Jig! (Ad blockers must be turned off)
Read How to use a Kreg Jig in THIS post.
Visit other projects I’ve made with a Kreg Jig HERE
Attaching back supports using wood strips
.
View Noel Christmas Tag sign HERE
If you don’t have a jig, you can install support planks running horizontally across the back.
I’d suggest building with shallow cedar strips, so the sign lays as flat against the wall as possible like the above project.

View Organic Coffee stencil HERE
Stenciling the coffee sign
.
3. Stencil Organic Coffee in the middle of the left 2 planks.
This coffee sign is looking mighty cool already, isn’t it?
Stencil tips for flawless results:
.
- Position stencil into place.
- Load stencil brush with Fusion’s Coal Black.
- Off-load most paint onto a rag to create a dry brush feel.
- Tap or swirl paint through the stencil to create the effect desired.
I like to swirl using a dome-tipped stencil brush myself. It allows you to ‘swirl’ on the paint easier.
Learn more about how to stencil from THIS POST or visit how-to stencil videos HERE
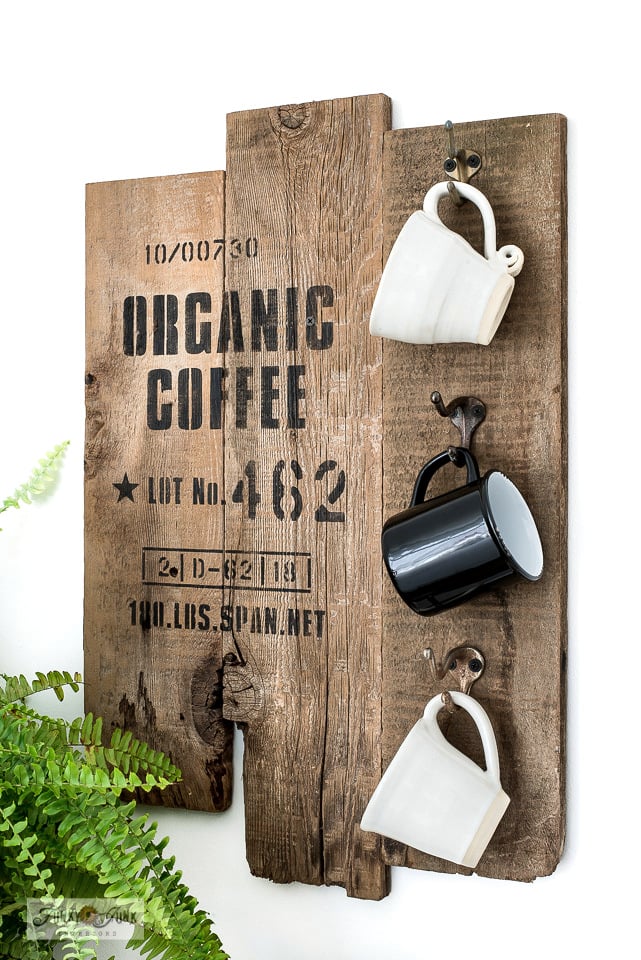
4. Attach rustic hooks on the far right board with screws.
Attaching hooks
.
I used some coat hooks I had on hand that pointed OUT more than UP like THIS TYPE HERE. This shallow styled hook takes up less space, giving you more room for the mugs.
And there you have the easiest and coolest wood Organic Coffee sign with mugs! This sign sure makes a neat coffee station, doesn’t it?
It’s just pretty to look at. Nothing like a little coffee sign wall art to give your coffee station a little boost of coffee shop vibe!
Love the clean and simple look to allow that rugged rustic wood be the star of the show… aside from my beloved coffee of course. These handmade pieces chime in well with the organic coffee sign vibe, don’t they?
This easy sign would also make unique gift ideas for the coffee lover in your life! Who wouldn’t want a cute coffee sign for their own coffee station? Can’t think of a better way to celebrate our fav brew.
Now all that’s left to do is grab a fresh cup of coffee at my new coffee bar…
Fun piece, isn’t it? Think you’ll try a 3-plank coffee sign similar to this?

View Organic Coffee stencil HERE
And many other coffee-themed stencils HERE
Other coffee-themed projects to make:
Organic coffee bulletin board on burlap
Filled with loads of vintage treasures!

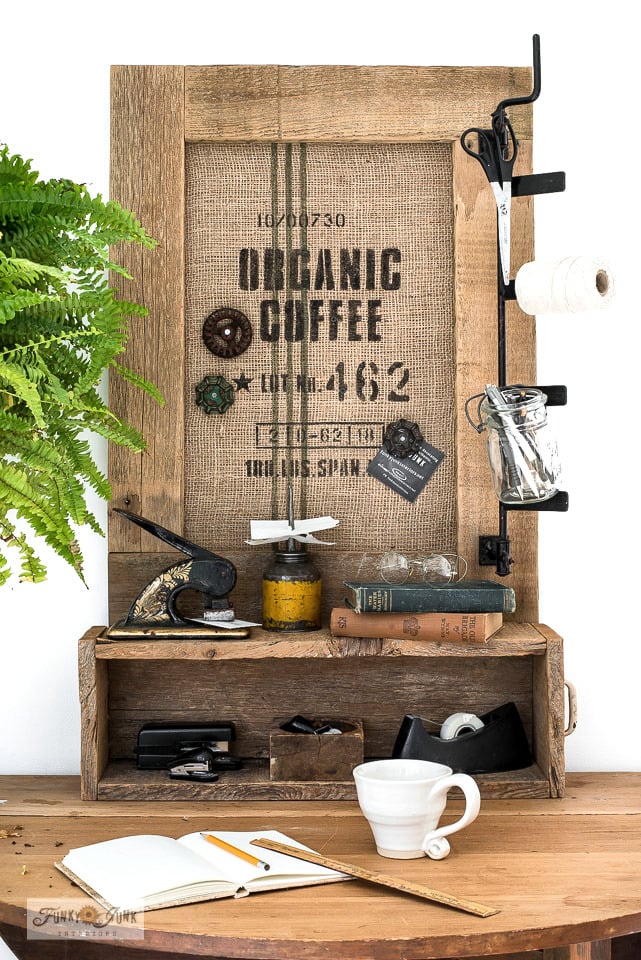
Organic coffee storage cabinet
The latest version of this sign!

Learn how to build a rustic appliance garage, coffee-themed

Double kitchen counter space with a coffee station crate

Make this easy 2 plank coffee sign that hangs mugs from S-hooks
Visit many other unique coffee-themed projects HERE
And lots of coffee stations HERE
You are so crazy talented Donna! Mad skills!
Thank you for the shout out. I can’t wait to use this stencil!
Thank-YOU for inspiring me, Kim! I’m madly in love with this stencil so I’m glad you gave me the nudge! Can’t wait to see what you do with it!
Hi you mentioned that you printed a screw selection chart at Kregjigs and I can’t find a printable version. Can you possible guide me to that chart?
Hi Vicky! Sure thing! You can just google ‘Kreg Jig Screw Length Chart’ and dozens pop up.
Here’s one on the Kreg Jig website:
https://learn.kregtool.com/learn/how-to-select-right-pocket-hole-screw/
I’ll create a new blog post that JUST explains how to use the jig too. I think it would be easier to learn from. Thanks for the reminder that it’s needed!
Yes, I would like to try and make one of the coffee signs. Another one of your creations that is doable and I have what I need here to make it. I know you enjoyed your coffee when you were done!
Haha, you know me well Joanne! I hope you give it a try!
I have another way to use this stencil that will be shared this week… still building the post. You may like it even more!
Yup, this design certainly inspired me!
This is great, love it! Most of all I miss your trips to Hawaii !! It’s been a long year.
Thank-you! And I also miss those trips… more than you will ever know. LOL